Inari figures

Dev

Cilla source code released

Finally, after almost three years of development, I have published the source code of Cilla. Cilla is the software that runs this blog.

I started working on a new blog software on June 3, 2009. It should replace my old home page made with PHP. I decided to write an own blog software in Java, as there was no open source Java blog software that suited my needs. However I never expected that this project would grow that huge. The core modules alone consist of 27,000 lines of code in 295 classes.

The core modules of Cilla are now available on my development site shredzone.org. The source code is published on GitHub. The documentation, a few plugins, and a simple example web frontend are still missing. I will publish them later.

Cilla is published under a GNU Affero General Public License.

hibernate3-maven-plugin fails with Java 1.7

If you're using Maven's hibernate3-maven-plugin for creating a DDL file from your entities, you might encounter the following error when using Java 1.7:

Execution default of goal org.codehaus.mojo:hibernate3-maven-plugin:2.2:hbm2ddl failed:
An AnnotationConfiguration instance is required

The reason seems to be a broken JRE detection in the Mojo code, which mistakenly assumes that Java 1.7 does not support annotations. However, I haven't checked that in depth.

The fix is pretty easy. In the plugin configuration of the hibernate3-maven-plugin, add an implementation property to the componentProperties like this:

<plugin>
  <groupId>org.codehaus.mojo</groupId>
  <artifactId>hibernate3-maven-plugin</artifactId>
  <version>2.2</version>
  <configuration>
    <componentProperties>
      <implementation>annotationconfiguration</implementation>
    </componentProperties>
  </configuration>
</plugin>

This enforces the use of an AnnotationConfiguration instance.

Arduino auf Fedora 15 einrichten

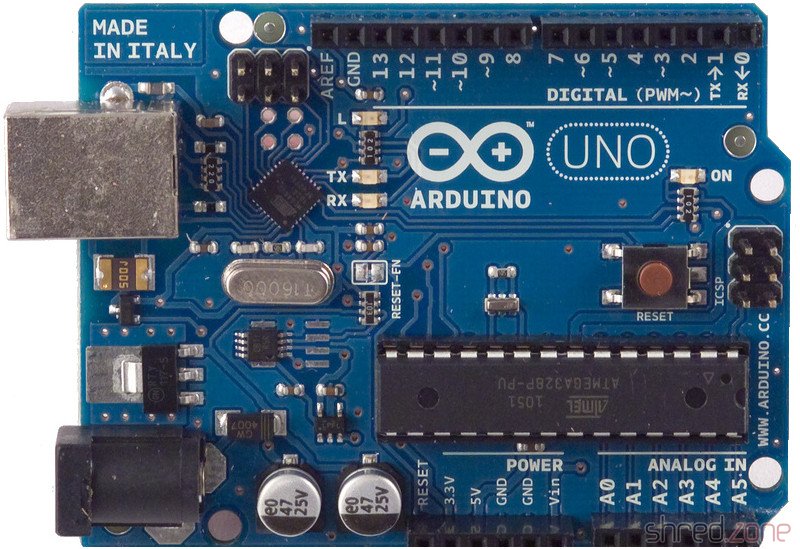
Die Arduino-Plattform ist eine offene Entwicklungsplattform für kleine Hardwareprojekte, inklusive einer Entwicklungsumgebung und verschiedener günstiger Boards wie dem Arduino Uno. Wegen verschiedener Bugs ist die Installation der Entwicklungsumgebung auf einem System mit Fedora 15 leider nicht ganz trivial.

Die notwendigen Pakete befinden sich im Fedora-Repository. Zuerst installieren wir also die Arduino-IDE und stellen die Gruppenrechte her, die zum Zugriff auf die USB-Schnittstelle benötigt werden:

sudo yum install 'arduino*'
sudo usermod -a -G uucp,dialout,lock $USER

Neben der IDE werden der C-Compiler avr-gcc in Version 4.6.1-2 und die avr-libc in Version 1.7.0 installiert. Diese Version des Compilers wirft allerdings nur Fehlermeldungen. Ein Update steht schon bereit, liegt derzeit aber noch in fedora-testing und muss deshalb explizit installiert werden:

sudo yum --enablerepo=updates-testing update 'avr-*'

Danach ist der avr-gcc in Version 4.6.1-3 und die avr-libc in Version 1.7.1 installiert. Die IDE kann nun gestartet und die Sketches können kompiliert werden.

Allerdings bleibt noch ein Problem: durch eine zu aggressive Compiler-Optimierung funktioniert die delay()-Funktion unter Umständen nicht. So leuchtet bei dem Beispiel Blink die Test-LED dauerhaft, statt zu blinken. Die Ursache dafür lässt sich zum Beispiel durch einen Eingriff in eine Datei beheben. Folgender Patch führt diese Änderung aus:

sudo patch -d /usr/share/arduino/hardware/arduino/cores/arduino wiring.c << __END__
25a26
> #include <avr/delay.h>
106c107
< {
---
> {/*
114a116
> */ _delay_ms(ms);
__END__

Danach steht der Experimentierfreude nichts mehr im Wege!

Treppenlicht 2.0

Es ist schon fantastisch, was man mit modernen LEDs alles anstellen kann.

Diese Wendeltreppe zum Beispiel soll dezent und Strom sparend beleuchtet werden, damit man sie auch im Dunkeln sicher benutzen kann. Eine Weihnachtslichterkette erfüllte den Zweck bisher. Allerdings war sie recht schwach und gab der Treppe außerdem einen hässlichen Partykeller-Look.

Dieser Blogartikel beschreibt, wie man sich mit ein wenig handwerklichem Geschick und geringem Aufwand eine Treppenbeleuchtung selbst bauen kann.

Continue reading...
Setting a renderer on JComboBox

When setting a custom renderer to a JComboBox, the usual way is to extend a DefaultListCellRenderer and override the getListCellRendererComponent() method. However, this may lead to ugly comboboxes on some Look and Feels. As you can see on the top combobox, it is rendered considerably smaller and with the letters sticked to the left border, just by using a DefaultListCellRenderer. The Look and Feel seems to use a special renderer class for proper rendering, as it is shown in the combobox below.

A solution is to use a proxy ListCellRenderer instead, which only converts the value and then delegates the rendering to the original renderer. For example:

public class ListCellRendererProxy implements ListCellRenderer {
  private final ListCellRenderer delegate;

  public ListCellRendererProxy(ListCellRenderer delegate) {
    this.delegate = delegate;
  }
  
  @Override
  public Component getListCellRendererComponent(JList list, Object value,
                int index, boolean isSelected, boolean cellHasFocus) {
    // modify the value here...
    return delegate.getListCellRendererComponent(list, value, index, isSelected, cellHasFocus);
  }
}

The renderer proxy can be used like this:

JComboBox cbx = new JComboBox();
ListCellRenderer oldRenderer = cbx.getRenderer();
cbx.setRenderer(new ListCellRendererProxy(oldRenderer));

The combobox items are now converted to a string by a custom cell renderer, but are still rendered by the original renderer implementation of the current Look and Feel. However, while a single DefaultListCellRenderer instance can be shared with many JComboBox, a new renderer proxy needs to be instanciated per combobox.