When the Amiga 1000 was launched in 1985, it was too expensive as a home computer, but rather targeted the professional graphics workstation market. The sales figures were correspondingly low. Only 27,500 units have been sold in Germany. Nevertheless, and without a doubt, the Amiga 1000 is the jewel of every Amiga collection. Now I finally had the lucky chance to get my own one.
The overall state is fine, considering that the machine is almost 40 years old. The Amiga itself is only a bit yellowed, but has some heavy scratchmarks at one edge. The keyboard has a French/Belgian AZERTY layout that was changed to German layout using stickers, like it was usual for the first machines that were sold in the EU. Its case and the space bar are much more yellowed. The stickers are also yellowed, and one is missing.
The expansion slot at the front contains a 256KB RAM module. The original mouse and the disks have been lost, but I can use any other Amiga mouse and make new disks myself.
What's Inside
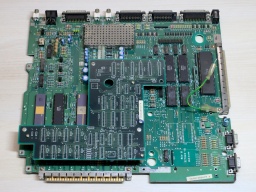
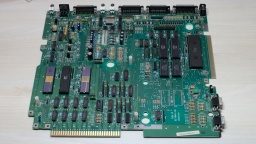
Inside I found a Rev A mainboard and a piggyback board. That extra board stores the Kickstart that is loaded from disk when the machine is powered up. Later revisions used Kickstart ROMs, and didn't need this piggyback board any more.
Usually all piggyback Amiga 1000 were produced for the US market. They could not run in Europe without modifications, due to different power frequencies and TV standards. My machine was produced in early 1986, presumably for the US market. One year later, it was modified for the European market. The original Agnus chip was replaced by a 8367R0 that is able to generate PAL video signals. The crystal is still the original 28.6363 MHz NTSC one though, so the video signal is not truly PAL.
The system has a Denise 8362R6, which is the first revision that is also capable of displaying the EHB mode.
Altogether, it is an early Amiga model, and very likely one of the first that have been sold in Germany.
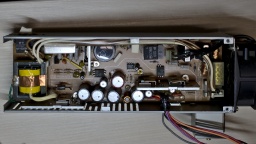
The PSU
Generally I don't recommend to power up an old computer straight away after many years of storage. Without a visual inspection and the necessary refurbishment, the power supply could damage the computer, or components inside could blow up.
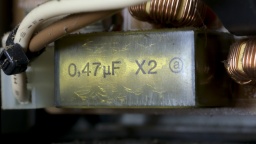
A first visual check of the PSU seemed to be allright, with no obvious damages, and no bulged or leaked capacitors. But then I found tiny cracks in one safety capacitor.
These RIFA X class capacitors are actually infamous for blowing up after many years. Their insulators are made from paper. The material gets brittle from age and thermal stress, letting in moisture, which amplifies the problem. Eventually the capacitor can crack open and go up in fumes.
It was good that I kept the PSU disconnected from mains. It is now being refurbished by @DingensCGN, a member of the A1K.org forum who has a lot of experience with Amiga PSU restauration.
The Mainboard
I recapped the mainboard and piggyback board. For the seven 22µF capacitors, I used a bipolar type instead. Those capacitors are used for filtering the audio and RGB signals. Using bipolar caps here might improve the signal quality, and won't hurt otherwise.
To be honest, this time I had doubt if I should replace the old capacitors. This Amiga 1000 will not become a workstation, I have other Amigas for that. It is rather a collectible. Still I want it to be in a good technical condition. When I started to collect retro computers, I promised myself not to keep machines that are broken or otherwise not fit for use.
After that I removed all the dust, and gave the boards a thorough wash with IPA.
The mainboard is now ready to get remarried with the piggyback board, and then move back into the case.
Whitening
The first thing I actually did was to disassemble the entire machine. The plastic parts of the case were cleaned in soap water and carefully scrubbed with a dishwashing brush. After that, I used the sunny July weather, and whitened all parts in the sunshine. I did not use any chemicals, just the sun. After two days, the Amiga was almost white again.
That's it for the first part of the Amiga 1000 story. The next part will be about the restauration of the keyboard. There is a lot to do there.


