Water reflections on a roof

#Fedora

Fedora, Darktable and Canon CR3 files

Note to myself, but maybe you found this article via search engine... 🙂

Symptome: You are trying to post-process a Canon CR3 RAW image file with Darktable, but it doesn't show any CR3 files.

Reason: Darktable uses LibRaw for reading CR3 files, which in turn uses exiv2. New file formats are not compiled into Fedora's exiv2 though, presumably for licensing or patent reasons (see this bug report, tl;dr).

Solution: Uninstall Fedora's Darktable version (either via dnf remove darktable or flatpak uninstall darktable), and install the flathub version via flatpak install darktable.

If you used the dnf version, you can copy the ~/.config/darktable directory to ~/.var/app/org.darktable.Darktable/darktable to keep your Darktable configuration.

DS3231 RTC on Raspberry with Fedora

A minor downside of the Raspberry Pi is that it is not equipped with a battery backed-up real-time clock. After every reboot, the system time is messed up and needs to be corrected by NTP, which in turn requires a network connection.

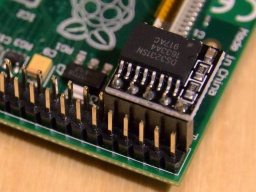
Luckily, there are readily assembled RTC modules available. They base on the DS3231 real time clock chip. A tiny battery is keeping the time when the Raspberry is disconnected from power. You can find those modules for less than two Euros a piece at marketplaces like Amazon, eBay, or Alibaba. The module is just plugged onto the pin header of the RasPi.

It is quite easy to use the RTC on Raspbian. On Fedora for Raspberry Pi, the installation was a little more tricky though.

In a first step, the RTC must be added as a new I²C device:

/usr/bin/echo ds3231 0x68 > /sys/class/i2c-adapter/i2c-1/new_device

(If you have a Raspberry Rev 1, you'd use /sys/class/i2c-adapter/i2c-0/new_device instead.)

The RTC does not store the time zone, so we need to tell the system that we'd like to use the system's time zone:

timedatectl set-local-rtc 0

And finally we copy the current system's time to the RTC chip:

hwclock -w

The RTC is now set up and ready for operation. But we're not done yet. When the system boots up, the DS3231 is unknown to the system again. We have to add a systemd service for adding it and reading the time, by creating a file called /etc/systemd/system/my-rtc.service with the following content:

[Unit]
Description=Enable battery backed-up RTC
Before=basic.target
After=sysinit.target
DefaultDependencies=no

[Service]
Type=oneshot
RemainAfterExit=yes
ExecStartPre=-/usr/bin/bash -c '/usr/bin/echo ds3231 0x68 > /sys/class/i2c-adapter/i2c-1/new_device'
ExecStartPre=-/usr/bin/sleep 0.2
ExecStart=/usr/sbin/hwclock -s

[Install]
WantedBy=basic.target

The service is enabled via:

systemctl enable my-rtc

And now every time the system boots up, the DS3231 is added as I²C device and the system clock is set to the time found in the RTC. If a network is available, NTP will later take over and set the network time.

It's not the most elegant solution, I guess. I had to add a sleep command because it turned out that the hardware is not immediately available after adding the device. I'd like to hear from you if you found a better way.

Remember to manually use hwclock -w from time to time, to reset the RTC to the correct time. If you shut down your RasPi frequently, you could add another systemd service that automatically writes the current time on system shutdown.

Kompakt und leise

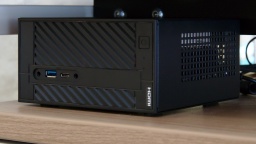
ASRock DeskMini A300 Kompakt, schnell und leise ist eine Herausforderung beim Selbstbau eines PCs. Meistens bekommt man nur zwei dieser Eigenschaften auf Kosten der dritten. Ich habe mich trotzdem an einen Versuch gewagt.

Das Ergebnis ist:

  • Gehäuse und Mainboard: Das ASRock DeskMini A300 ist ein Barebone, das kaum größer ist als ein ATX-Netzteil. Trotzdem hat es genug Platz für einen Prozessor mit AM4-Sockel und einer Verlustleistung von bis zu 65 Watt. Dazu passen zwei 2,5-Zoll-Festplatten und zwei M.2-SSDs hinein. WLAN gibt es optional dazu. Versorgt wird das Gerät mit einem externen 300W-Notebook-Netzteil.
  • Kühlung: Ich verzichtete auf den beigelegten Kühlkörper und baute ein Noctua NH-L9a-AM4 ein. Die Lüfter- und Kühlkörper-Lösung ist wie für dieses Gehäuse gemacht. Der Lüfter ist enorm leise. Selbst unter Last ist nur ein leises Rauschen zu hören, das überhaupt nicht stört.
  • CPU: Hier setzte ich auf einen AMD Ryzen 5 2400G, welcher sich bereits in meinem PC unter Linux bewährt hat. Mit 65 Watt TDP passt er in das Gehäuse und bietet mehr aus ausreichend Leistung für Office-Anwendungen, Video-Streaming und einfache Games.
  • RAM: 8 GB DDR4-2400 SO-DIMM als Kit mit 2x 4 GB. Für den gedachten Anwendungszweck reicht das. Bei einer Bestückung beider Slots mit Dual Rank-Modulen ist bei 2400 MHz Schluss, so dass der Kauf höher getakteter Speicherriegel nur Geld verschwendet hätte.
  • SSD: Als Festspeicher wurde eine vorhandene 2,5-Zoll SATA-SSD weiter verwendet.

Das System ließ sich zügig zusammenbauen. Problematisch war lediglich die Montage des Noctua-Kühlers. Dafür muss die vorhandene Halterung samt Bodenplatte entfernt werden. Anschließend wird Wärmeleitpaste auf die CPU aufgetragen, der Kühler daraufgelegt und von unten auf die beigelegte Bodenplatte geschraubt. Es erfordert schon ein wenig Geschick, den Kühlkörper dabei so wenig wie möglich zu bewegen, um die Wärmeleitpaste nicht zu verschmieren. SATA-Festplatten werden mit einem Spezialkabel mit dem Mainboard verbunden. Auch hier war es ein wenig Fummelei, den Spezialstecker auf das Mainboard zu stecken.

Bei einem ersten Test bootete ein Fedora 29-Livesystem auf der Maschine. Nachdem ich aber das BIOS auf die aktuelle Version 3.40 aktualisiert hatte, verweigerte das Livesystem selbst im Kompatibilitätsmodus den Dienst. Erst Fedora 30 (welches derzeit noch im Beta-Stadium ist) bootete problemlos und ließ sich ebenso leicht installieren.

Das System arbeitet unter Fedora 30 einwandfrei und stabil, selbst mit zwei angeschlossenen Monitoren. Beeindruckt hat mich vor allem der ruhige, nahezu lautlose Betrieb, der trotz dieser kompakten Abmessungen möglich ist. Darüber hinaus lässt sich ein solches System für einen verhältnismäßig günstigen Preis zusammenbauen. Es eignet sich bestens als kompakter Schreibtischrechner oder anspruchsvoller HTPC.

Google Earth Pro auf Fedora installieren

In dem Fedorablog, den ich ganz früher mal geschrieben hatte, hatte ich ein regelmäßig wiederkehrendes Thema: Die Installation von Google Earth. Lange Zeit war das echte Handarbeit, obwohl Google ein RPM-Paket bereitstellte.

Seitdem sind viele Jahre vergangen. Mittlerweile stellt Google die ehemals kostenpflichtige Pro-Version von Google Earth zum kostenlosen Download für Linux zur Verfügung. Und auch die Installation ist glücklicherweise kein Problem mehr. Es reicht schon, das RPM-Paket zu installieren:

sudo dnf install google-earth-pro-stable-current.x86_64.rpm

Auf deutschen und österreichischen Systemen¹ muss anschließend noch eine kleine manuelle Änderung vorgenommen werden. Der Grund dafür ist, dass die Google-Server bei der Ortssuche Geokoordinaten mit Dezimalpunkt ausliefern, das System aber das bei uns übliche Dezimalkomma erwartet und die Zahlen deshalb nicht verarbeiten kann. Die virtuelle Erdkugel dreht sich dann immer mitten auf den Atlantik statt auf die gewünschte Markierung.

Eine einfache Lösung ist, die Datei /opt/google/earth/pro/googleearth mit einem Texteditor zu bearbeiten (Root-Rechte erforderlich) und in der letzten Zeile der Datei ein LC_NUMERIC=us_US.UTF-8 einzufügen:

LD_LIBRARY_PATH=.:$LD_LIBRARY_PATH LC_NUMERIC=us_US.UTF-8 ./googleearth-bin "$@"

Danach sollte Google Earth Pro problemlos und stabil laufen.


¹) Nach meinen Recherchen verwendet ein Linux mit schweizerdeutscher Einstellung den Dezimalpunkt. Die Anpassung ist dann nicht nötig, schadet aber auch nicht.

CircuitPython and Fedora

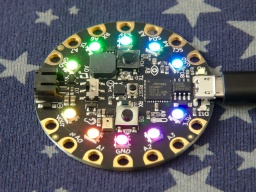
The season of long winter nights is coming, so I got myself an AdaFruit Circuit Playground Express for some home decoration.

My plan is to program it using CircuitPython, a MicroPython derivate that is adapted to the AdaFruit hardware.

CircuitPython must be installed to the Circuit Playground first, which turned out to be difficult with Fedora Linux in a first attempt. The troublemaker was the ModemManager, which is still installed by default. It detects the serial port of the AdaFruit device, and then hogs this resource because, well, it might be a modem. 🙄

My older readers certainly still remember what a modem is. 😉 But to make a long story short, almost no one is using a serial modem nowadays, so the ModemManager does not serve any useful purpose. However, it cannot be removed, because other important packages still depend on it. The only way is to stop it permanently:

sudo systemctl stop ModemManager
sudo systemctl disable ModemManager

After that, I could finally install CircuitPython to the Circuit Playground. First I downloaded the matching uf2 file. After that, I connected the Playground via USB, and changed to the bootloader mode by pressing its reset button twice (like a double-click).

The Circuit Playground is now mounted as an USB drive called CPLAYBOOT. All there is to do now is to copy the uf2 file to this drive. The Playground automatically reboots after that. If everything went fine, it will come back as an USB drive called CIRCUITPY.

The next step is to install the AdaFruit libraries to that drive. I downloaded the latest library bundle that matched my CircuitPython version, and just unpacked it to the CIRCUITPY drive.

That's it... All there is to do now, is to open the code.py file in an editor and change the code. It is immediately executed when it is saved.

For a start, there are a lot of code examples for the Circuit Playground Express on the AdaFruit web site.