 I recently found an article about the AS3935 Franklin Lightning Sensor. As I am already recording some weather data, it immediately raised my interest.
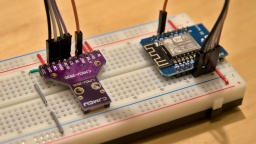
The sensor module can be found at many online shops selling products from China. It is not really cheap, but still affordable. I decided to use an ESP8266 as microcontroller, so I can read the sensor data by WLAN. The sensor is connected to the ESP via SPI. There was also some space left for a SK6812 RGBW LED indicating the sensor status.
The result of this project can be found at GitHub. It's called Kaminari (which is Japanese for lightning), and also comes with OpenSCAD files for a 3D printed, pyramid shaped case with illuminated tip. In this article I will explain a bit about how I developed the Kaminari firmware.
UPDATE: Meanwhile I have removed the pyramid case from the project. The reason is that in that case, the ESP and the sensor are too close together, so the ESP's WiFi antenna was massively disturbing the sensor. There is no replacement case.
The first problem was the calibration. The sensor is roughly pre-calibrated, but must be fine-tuned to 500 kHz ±3.5% via the TUN_CAP register. For this purpose, the antenna frequency can be routed to the IRQ pin and then be measured by the ESP. I chose to prescale the frequency by a ratio of 128, giving an IRQ frequency of 3,906.25 Hz. For measurement, I've set an IRQ handler that is just counting up a variable on each interrupt. I then reset the counter, wait for 1000 ms, then read the counter, and get the IRQ frequency in Hz units. It's not 100% accurate, but good enough for this purpose.
The TUN_CAP register offers 16 calibration steps. Just incrementing it until the frequency matches, would take up to 16 seconds. Instead I used an algorithm called successive approximation to find the correct calibration value in only 4 iterations, taking a quarter of the time.
 To my disappointment, it turned out that the manufacturer of my module (CJMCU) has used nonstandard components, so my module could only reach a maximum frequency of about 491 kHz. I first suspected that the ESP might be too slow for this kind of measurement, but a scope connected to the IRQ pin confirmed the frequency. Well, it is still within the required tolerance, but it gives a suboptimal tuning result and renders the
 TUN_CAP register useless.
The next problem is finding a good noise floor level. This is some kind of background radio noise filter. If the level is too low, the sensor cannot operate properly because of interfering background noise. If it is set too high, the lightning detection quality declines.
The noise floor level cannot be calibrated just once at the start. Radio noise sources come and go, may it by turning on an electronic device or just by a change in the weather. I did some experiments, and the most promising solution is a kind of tug-of-war. When the AS3935 detects too much noise, it triggers an interrupt, and the noise floor level is raised to the next higher step. If the last level change was 10 minutes ago, the ESP attempts to reduce the level by one step.
In order to reduce the number of level changes, I have added a counter. Each noise interrupt increments the counter, and every 10 minutes the counter is decremented. The level is raised when the counter reaches 2, and lowered when the counter reaches -2.
Sometimes I noticed a "noise level runaway", where the AS3935 triggers a lot of noise interrupts in a very short time, raising the noise floor level to its maximum value immediately. To stop that behavior, further noise interrupts are being ignored for one minute after a noise interrupt has been processed.
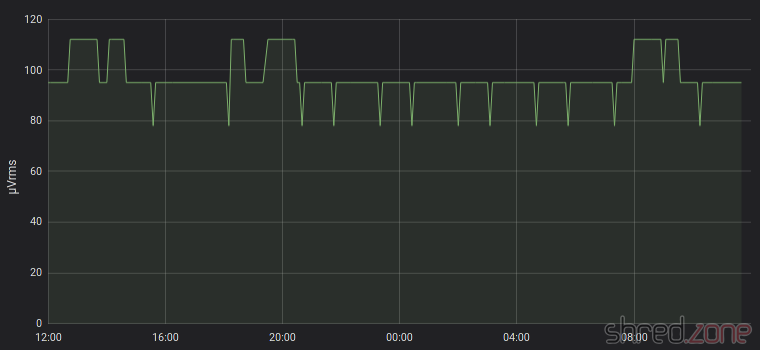
Now the noise floor level has settled to an average of 95 µVrms here. In the graph, one can see that the level is raised at some time, but then reduced again after a while. One can also see the frequent attempts to lower the level a bit further, immediately followed by a raise back to the average level. It seems that the AS3935 and the ESP have negotiated a good compromise. 😉

The AS3935 seems to be set up in an optimal way now, but I still get some false lightning events from time to time. There are a few registers left to experiment with, namely WDTH (watchdog threshold), SREJ (spike rejection) and MIN_NUM_LIGH (minimum number of lightning). I have raised the watchdog threshold to 2, and did not have a false lightning event since then.
Now I have to wait for some real lightnings… 😄


