Peace Memorial Park, Hiroshima

#Z80

Multiplication on a Z80 processor

The one thing computers are really good at is calculating. You might now expect that all CPUs are capable of the four basic arithmetic operations, but that isn't the case. The first 8 bit processors were only able to add and subtract numbers, and even the subtraction was performed by adding the negated subtrahend. Multiplication and division instructions first appeared on 16 bit processors, albeit they were still very slow in the first generation.

Simple multiplications and divisions by powers of two can be achieved by shifting a value bitwise to the left or right, respectively. This is, shifting a value by one bit to the left is the same as multiplying it by 2, while shifting by two bits to the left multiplies it by 4, and so on.

But how can we multiply any two numbers? It has to be done step by step, by using basic operations like addition or bit rotation. This article will explain how it works on a Z80 CPU.

Back at school, we have learned to multiply large numbers by long multiplication. Basically, we break up the problem by multiplying the multiplier with each digit of the multiplicand, and then summing the products. For example, if we want to compute the product of 27 and 12, we compute 27×2 = 54 and 27×1 = 27, and then sum the products 57+270 = 324.

  27 × 12
———————————
       54
 +    27∙
———————————
      324

We can use the same algorithm on a computer. But wait, wouldn't we still have to multiply, even if with smaller numbers? Actually, no! Since computers use binary digits, we only need to multiply either by 1, giving the value itself, or by 0, always giving 0.

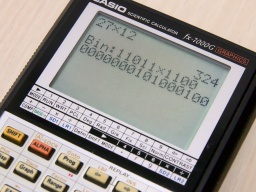
This is the the same long multiplication of 27 (11011) and 12 (1100) with binary numbers:

  11011 × 1100
————————————————
         00000
        00000∙
       11011∙∙
 +    11011∙∙∙
————————————————
     101000100

The steps can be executed in a loop. At the beginning, a result register is initialized with zero. If the rightmost bit of the multiplicand is 1, the multiplier is added to the result register. After that, the multiplicand is rotated to the right by one bit, and the multiplier is rotated to the left by one bit. This loop is repeated until the multiplicand is zero, because the result won't change after that anymore.

The following Z80 assembler code example multiplies the values in the BC and DE register pairs, and returns the product in the HL register pair. If an overflow occured during multiplication, the Carry flag will be set.

The multiplicant is kept in the BC register pair. To rotate it one bit to the right, we first use the srl b instruction. It rotates the B register, moving the value of bit 0 to the Carry flag, and inserting a 0 to bit 7, so the multiplicant is filled up with zeros with each rotation. After that, rr c rotates the C register and moves the content of the Carry flag to bit 7. Both instructions combined rotate the BC register pair one bit to the right, insert a 0 to the highest bit. The lowest bit is moved to the Carry flag, where it can be tested.

image/svg+xml0010010110011010Carry0BCCarrysrl brr c7654321076543210

We essentially do the same with the multiplier in the DE register pair, but in the opposite direction. As a rotation to the left by one bit essentially just doubles the value, we also could have used add de,de. Sadly the Z80 does not offer such an instruction.

multiply:	ld	hl, 0		; clear the result register
.loop:		ld	a, b		; is BC == 0?
		or	c		;   (also resets carry flag)
		ret     z		; then we're done!
		srl	b		; logical right shift of BC
		rr	c		; bit 0 goes to carry flag
		jr	nc, .zerobit	; unless bit 0 was 0
		add	hl, de		; add multiplier to result
		ret	c		;   return on overflow
.zerobit:	sla	e		; shift multiplier to the left
		rl	d		;   topmost bit goes to carry flag
		ret	c		;   return on overflow
		jr	.loop		; next iteration

The example only multiplies positive integers. To multiply negative integers, we first need to change all factors to positive numbers and do the multiplication. The result then needs to be negated if one of the factors was negative, but not both.

Z80 Disassembler

Some days ago, I was adding a Z80 disassembler to my tzxtools. I could not find one for Python, so I decided to write my own. The result fits into a single Python source file. This article is the Making-of…

The Zilog Z80 is an 8 bit processor. This means that (almost) all instructions only consume 1 byte. For example, the instruction ret (return from subroutine) has C9 as byte representation. Some commands are followed by another byte (as a constant to be used, or a relative jump displacement) or another two bytes (as a 16 bit constant or absolute address). Some examples:

C9------retReturn from subroutine
3E23----ld a,$23Load constant $23 into A register
C33412--jp $1234Jump to address $1234

Note that for 16 bit constants, the bytes seem to be reversed in memory. This is because the Z80 is a so-called little endian CPU, where the lower byte comes first. Some other processor families (like the 68000 ) are big endian and store the higher word first.

So there are 256 instructions only, which makes it pretty easy to disassemble them. I used an array of 256 entries, where each entry contains the instruction of the respective byte as a string. For constants, I have used placeholders like "##" or "$". If such a placeholder is found in the instruction string after decoding, the appropriate number of bytes are fetched, and the placeholder is replaced by the value that was found.

If we were to write a disassembler for the 8080 CPU, we were done now. However, the Z80 has some extensions that need to be covered, namely two extended instruction sets and two index registers.

One set of extended instructions is selected by an $ED prefix, and contains rarely used instructions. The other instruction set is selected by a $CB prefix and has bit manipulation and some rotation instructions.

EDB0----ldirCopy BC bytes from HL to DE
ED4B7856ld bc,($5678)Loads value from address $5678 into BC register pair
CBC7----set 0,aSet bit 0 in A register

For the $ED prefix, I used a separate array for decoding the instructions. The $CB instructions follow a simple bit scheme, so the instructions could be decoded by a few lines of Python code.

The Z80 provides two index registers, called IX and IY. They are used when the instruction is prefixed with a $DD or $FD byte, respectively. These prefixes basically use the selected index register instead of the HL register pair for the current instruction. However, if the (HL) addressing mode is used, an additional byte sized offset is provided. The index registers can be combined with the $CB prefix, which can make things complicated.

E5------push hlPush HL to stack
DDE5----push ixPush IX to stack (same opcode E5, but now with DD prefix)
FDE5----push iyPush IY to stack (now with FD prefix)
FD2180FFld iy,$FF80Load $FF80 constant into IY register
DD7E09--ld a,(ix+9)Load value at address IX+9 to A register (offset is after opcode)
CBC6----set 0,(hl)Set bit 0 at address in HL
FDCB03C6set 0,(iy+3)Set bit 0 at address IY+3 (offset is before opcode)

When the disassembler detects a $DD or $FD prefix, it sets a respective ix or iy flag. Later, when the instruction is decoded, every occurance of HL is replaced by either IX or IY. If (HL) was found, another byte is fetched from the byte stream and used as index offset for (IX+dd) or (IY+dd).

There is one exception. The examples above show that the index offset is always found at the third byte. This means that when the index register is combined with a $CB prefix, the actual instruction is located after the index. This is a case that needed special treatment in my disassembler. If this combination is detected, then the index offset is fetched and stored before the instruction is decoded.

Phew, this was complicated. Now we’re able to disassemble the official instruction set of the Z80 CPU. But we’re not done yet. There are a number of undocumented instructions. The manufacturer Zilog never documented them, they are not quite useful, but they still work on almost any Z80 CPU and are actually in use.

Most of them are covered just by extending the instruction arrays. Additionally, the $DD or $FD prefixes do not only affect the HL register pair, but also just the H and L registers, giving IXH/IYH and IXL/IYL registers. This is covered by the instruction post processing. A very special case is the $CB prefix in combination with index registers, giving a whole bunch of new instructions that store the result of a bit operation in another register. This actually needed special treatment by a separate $CB prefix instruction decoder.

Finally, the ZX Spectrum Next is going to bring some new instructions like multiplication or ZX Spectrum hardware related stuff. They were again covered by extending the instruction arrays. The only exceptions are the push [const] instruction where the constant is stored as big endian, and the nextreg [reg],[val] instruction that is (as the only instruction) followed by two constants.

And that’s it. 😄 This is how to write a Z80 disassembler in a single afternoon.

Optimizations

On a slow processor like the Z80, it is essential to think about execution time. Often a clean approach is too slow, and you need to optimize the code to make it a lot faster.

The ZX Spectrum screen bitmap is not linear. The 192 pixel rows are divided into three sections of 64 pixel rows. In each of these sections, all the 8 first pixel rows come first, followed by the second pixel rows, and so on. The advantage is that when writing characters to the bitmap, you only need to increment the H register to reach the next bitmap row. The disadvantage is that a pixel precise address calculation is hell.

This is how the coordinates of a pixel are mapped to the address:

HL
1514131211109876543210
010Y7Y6Y2Y1Y0Y5Y4Y3X7X6X5X4X3

X2, X1 and X0 represent the bit number at the address. It can be used as a counter for right shift operations.

My first attempt was a straightforward code that shifted, masked and moved the bit groups into the correct places. It took 117 cycles. This is nice, but we can do better.

We need a lot of rotation operations to shift the bits to the right position. Rotation is a rather expensive operation on a Z80, because there are no instructions that rotate by more than one bit at a time. My idea was to divide the X coordinate by 8 (by rotating it three times to the right) and simultaneously shift Y3 to Y5 into the L register. With a similar trick, I could set bit 14 while rotating, which saved me another or operation with a constant.

This is the final optimized code. It takes the X coordinate in the C register, and the Y coordinate in the B register. The screen address is returned in the HL register pair. BC and DE are unchanged, so there is no need for expensive push and pop operations.

pixelAddress:   ld      a, b
                and     %00000111
                ld      h, a    ; h contains Y2-Y0
                ld      a, b
                rra
                scf             ; set bit 14
                rra
                rra
                ld      l, a    ; l contains Y5-Y3
                and     %01011000
                or      h
                ld      h, a    ; h is complete now
                ld      a, c    ; divide X by 8
                rr      l       ; and rotate Y5-Y3 in
                rra
                rr      l
                rra
                rr      l
                rra
                ld      l, a    ; l is complete now
                ret

It only takes 108 cycles, ret inclusive. Optimizing saved me 9 cycles (or about 8%). This doesn’t sound like much, but if the code is invoked in a loop, those 9 cycles are multiplied by the number of loop iterations.

I claim this is the fastest solution without resorting to a lookup table. Try to beat me! 😁

ZX Spectrum retro game programming

If you are a child of the 1980’s, you maybe remember the Sinclair ZX Spectrum. It was an affordable home computer that could be connected to a color TV set, and used compact cassettes as mass storage.

My first computer was a Sinclair ZX-81. I learned BASIC and also Z80 assembler on it. Soon the ZX-81 was replaced by a ZX Spectrum. I programmed a lot, wrote all kind of tools and a few demos. I always wanted to write a game together with my friends, but as teenagers we lacked the necessary persistence to bring such a project to the end. Then, on the day I got my Amiga 500, I quickly lost any interest in my good old Spectrum.

But it’s never too late... I just started a tiny little game project called Coredump, written in Z80 assembler for the good old ZX Spectrum. Why? Just because I can. Because I always wanted to. And because retro programming also means a lot of fun!

This first article is about the tool chain I am using. I will add more articles as the game grows and is (hopefully) completed some day.

Back in the 80’s, programming assembler on the ZX Spectrum was a very tedious task. I had to deal with cassette tapes (and their very slow access), an assembler that already consumed some of the scarce RAM, and I had no tools that simplified the development process. When I did a mistake and crashed the Spectrum, I needed to reload the assembler, the source code and the resources from tape. Often I also lost some of my work because when dealing with tapes, saving a source code is much more work than just pressing Ctrl-S, so I rather risked having to retype the changes after a crash.

Today it’s much easier to write retro software. I can develop it on my Linux machine, which is very fast and has a lot of storage space. I use a modern text editor and a lot of powerful tools. For testing, I just need to assemble a snapshot file and run it on an emulator, which takes less than a second. If the emulator crashes, no work is lost.

These are the tools I use for programming. All of them are available for Linux and MacOS, some also for Windows.

  • Fuse is an excellent ZX Spectrum emulator, with a very precise timing.
  • A decent editor. I started with Atom, but now I am using Eclipse because it fits better to my workflow. Just use your favorite editor.
  • zasm is a nice Z80 cross assembler that is also able to generate SNA files that run on the emulator.
  • Multipaint is an open source drawing tool that handles the limitations of the ZX Spectrum graphics (and believe me, there are limitations). It turned out not to be so useful for sprite and tile generation, because it does not offer a precise control of the paper and ink color that is used in the generated screen file.
  • So I also use Gimp for pixeling sprites and tiles. Maybe I will also use Inkscape later.
  • Tiled is an excellent map editor. I use it to design the world of my game.
  • Some self made helper tools convert the graphics and the world into the binary format that is used in the game. I use Java for these tools, just because I am most proficient with Java. There is no technical reason for that, just use the language you feel most comfortable with.
  • Finally, I use ant to stitch all the parts together and run the snapshot file.

The ZX Spectrum hardware is very simple and easy to understand (which also means that you have to do a lot of things without hardware aid). The Z80 processor has a simple instruction set. So retro programming is not just for the old-agers, but also for the young generation who is interested in a first approach to the hardware level of computers. It is also fun to get the most out of a limited and slow hardware.

There is a lot of documentation available in the net:

  • World of Spectrum has a lot of hardware documentation in the references section.
  • A quick overview of all Z80 instructions and their timings.
  • A commented ROM disassembly gives a first look at the Z80 assembler, and also offers some useful functions (like multiplication, the Z80 itself does not offer any multiply or divide instructions).

When I started looking for resources to the ZX Spectrum, I was surprised about how active the retro scene is. There are a lot of blogs offering tutorials that explain hardware tricks, and there is even a demo scene showing you things you’d never thought to be possible on that machine. After all, the Speccy is almost 35 years old now, and wasn’t famous for a powerful hardware even back at its time.