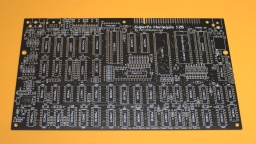
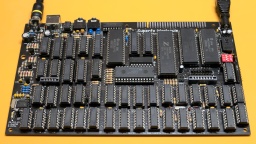
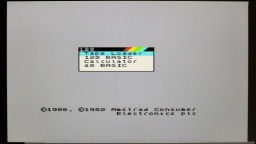
The Superfo Harlequin is a ZX Spectrum 128K clone. It is special because even though it's a 128K Spectrum, it still fits into an 48K Spectrum case. It's also special because the ULA custom chip is replicated by discrete 74HC-type standard chips that can be replaced easily if one of them should get broken. It's just a small advantage though, because the RAM chips, sound chip, and Z80 CPU are rare by now.
I have ordered the Harlequin 128K Black Large DIY Kit at ByteDelight. It comes with all components that are required to build the main board, even those that are difficult to find elsewhere. There is also a Flash ROM chip enclosed in the kit, but it does not contain a Sinclair ROM image for license reasons. What's still required to build a complete Speccy is a ZX Spectrum case with keyboard, and a Flash ROM programmer for the Sinclair ROM.
Assembling
The Harlequin has only a single SMD component, and that one was even presoldered. All the other components are through-hole, so this DIY kit is even suitable for soldering novices.
I spent the rest of the day with getting the components out of their bags, locating their correct location and then soldering them in. The ByteDelight kit was carefully assembled. Every component comes in separate bags per value, and are enumerated in their optimal order for assembling. It's literally just soldering by numbers. 😄
The most boring part was to solder in all the 51 sockets. The DIY kit came with standard sockets, but I generally prefer turned pin sockets, so I used that ones instead.
The kit also contains the crystal that is needed for an NTSC setup, so you can choose between a PAL and NTSC machine. The board itself is pre-configured for PAL though. For an NTSC machine, a few traces at the bottom side of the PCB need to be cut.
Flashing the ROM
The DIY kit comes with an AMD AM29F040B Flash ROM. It is large enough to contain up to 8 ROM images. A DIP switch selects the image to be used. The pre-flashed image contains a Diag ROM, some other software, but no ZX Spectrum ROM for license reasons. The board itself also supports original Spectrum 48K and 128K ROMs, as well as 27C256 and 27C512 EPROMs.
ROM files can be found on the internet. I decided to keep the first six Flash ROM banks, and use bank 7 for a Spectrum 48K ROM, and bank 8 for a Spectrum 128K+2 ROM.
For flashing, I use the XGecu TL866II+ programmer and the minipro open source software. First I read the original content of the Flash ROM:
minipro --device 'am29f040b@DIP32' --read harlequin.bin
Then I made a copy of the first six banks. It's easy with the dd command. With a block size of 65536 bytes, the banks can be selected with the skip and count options. To keep the first six banks:
dd if=harlequin.bin of=harlequin-6banks.bin bs=65536 count=6
After that, I use cat to compile a new binary. Note that each bank must be 65536 bytes large, so if a ROM image is smaller, it must be duplicated (or quadruplicated):
cat harlequin-6banks.bin \
  48k.rom 48k.rom 48k.rom 48k.rom \
  128k+2.rom 128k+2.rom \
  > harlequin-new.bin
The new image can then be burned to the Flash ROM:
minipro --device 'am29f040b@DIP32' --write harlequin-new.bin
With the Flash ROM inserted into the Harlequin board, it was finally completed and ready for a first start. Unfortunately the maker of the Harlequin board saved a rectifier bridge, so it's still important to take care for the correct polarity of the power plug. Like the ZX Spectrum, the Harlequin needs a power supply with a 5.5/2.1 mm barrel plug with center negative. Most power supplys on the market are center positive.
Even though the Harlequin has a lot more chips than an original ZX Spectrum, it is very frugal. It only consumes 1.7W at 9V, while the original Speccy consumes 4.8W. On the other hand, the Harlequin does not need 12V and -5V to run, so these voltages are not generated. This might be a problem for a few very exotic expansions.
The Case
The DIY kit only comprises everything that is needed to assemble the main board. What's missing is a case with keyboard, and a power supply. The board has the same dimension as an original ZX Spectrum 48K board, so you can use original cases (e.g. the standard "rubber key" case or the ZX Spectrum Plus case), or buy a new replica case with new membranes, keymat and faceplate. The latter case is more expensive, but you get a brand new case in return, and you can pick from a large variety of colors.
I decided for a white keyboard, and a transparent case so one can still admire the beautiful Harlequin board even inside a closed case.
The Harlequin has a separate RGB mini DIN connector. It is made in a manner so it won't interfere with a classic case. However you might want to use the RGB connector as it offers a much better image quality. Shops like ZX Renew offer special Harlequin cases with a cutout for the RGB connector. If you want to use a classic case, you might need to cut out a bit of the beautiful old case to access the connector.
Since we are talking about making holes into old cases: The Harlequin has a built-in joystick interface. If you want to, you can cut out a space for a 9 pin Sub-D male connector, and wire it to the board. I refrained from making a cut into my beautiful Harlequin case, and use a classic Kempston joystick interface instead.
Let's Play
The simplest way to load software into the Harlequin is by the Mic/Ear port. There are smartphone apps and also a lot of tools that can generate the sounds to load TAP or TZX files, so there is no need to dig out the old tape recorder and audio cassettes.
I am using my tzxtools. The tzxplay command plays back TZX and TAP files to the standard audio output. I connect the sound card output to the mic/ear connector using a classic phone jack cable.
Since the Harlequin is a full-featured 128K clone, it also comes with an AY-3-8912 sound chip and even a stereo output. So the first thing I did was loading a game that makes use of that soundchip for in-game music.


