In the first part, I took the Amiga apart and repaired the main board. In this second part, I will take care of a new PSU, and then I will put the system back together.
New PSU
There are also capacitors in the PSU that dry out over the years and need to be replaced. But as I'm not a trained technician, I keep my hands off all kind of hardware as soon as mains power is involved.
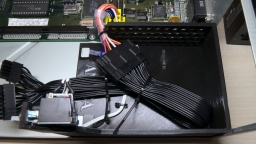
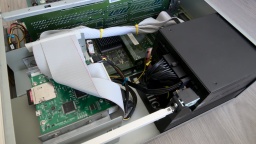
Surprisingly, a standard SFX form factor PSU perfectly fits into the power supply opening at the back side of the Amiga case. Even the two screw holes of the case match perfectly, almost as if the SFX form factor was just invented for that purpose. There is sufficient space below the PSU for the fan to transport the warm air from inside the case to the outside. There is also enough space for the longer SFX-L form factor. Most of them use a silent 120mm fan. All it needs is a frame where the power supply can sit on.
Not all SFX PSUs are suitable for the Amiga though. The reason is that in modern PCs, the main load is on the 12V line, and there is also a 3.3V line. The Amiga however has its main load on the 5V line, the load on the 12V line is neglectible, and the 3.3V line is not needed at all. Most modern PSUs are regulated on the 12V line. If there is too little load on it, the other voltages may become instable. In best case, the Amiga will then just crash. In worst case, its hardware will be damaged. There are experts who generally advise against using PC PSUs as a replacement power supply, so let me give some warnings before I go on with the article.
WARNING: I recommend to keep the original Amiga PSU, and have it overhauled by an expert. Using a different PSU may cause permanent damage to your Amiga, possibly years after the modification. Self-made power adapters can damage your Amiga if incorrectly wired, and may even cause a fire if underdimensioned or short-circuited. You reproduce the following modification at your own risk. If in doubt, keep using your original Amiga PSU.
The original Amiga 4000 power supply has a maximum load of 145W. Even the smallest SFX PSU is able to deliver far more than that, so basically you can choose any PSU which provides at least 90W (18A) on the 5V line. Still the actual choice is very small. Firstly, the PSU should generate the 5V by a separate DC/DC converter, so the voltage is stable even if there is almost no load on the 12V line. Secondly, the PSU fan needs to be active all the time, as it is the only fan in the Amiga that transports the warm air out of the case. Many modern PSUs have a hybrid fan control though, and operate in a passive cooling mode on low load conditions.
For my Amiga, I use:
- A be quiet! SFX-L Power 500W PSU. According to the manufacturer the 5V is generated by a DC/DC converter, and all supplied voltages have a specified minimum load of 0A. Also the fan is permanently operating, but still almost inaudible. Some of the connectors of the modular design collide with the power switch, but that's not a problem unless you plan to use more than three drives.
- A 3D printed SFX adapter frame.
- A Canal PSD-1 power switch. They are not manufactured any more, but can still be found at online marketplaces. If you cannot get one, you can also take the one from your original PSU. (Do not open the PSU case, but ask an expert to remove it for you.)
- An ATX to Amiga power adapter. I made one myself using an "ATX to Acer 12-pin" power adapter, a TE Connectivity Mate-N-Lok 6 circuit plug that is still available today, and a crimp tool. Some Amiga shops also sell readily assembled adapters.
To build the power adapter, the wires need to be connected between the Amiga power plug and the corresponding pin of the ATX power connector. The PS_ON# and one of the COM pins are connected to the power switch. All wires should be sufficiently dimensioned.
When everything is assembled, make sure (make double sure, make even triple sure) that the wiring is correct, but do not plug the connector into the mainboard yet. Now press the power button and check the voltages. PWR_OK should have 5V, but it may flutter or even be 0V because the PSU has no load right now. The other voltages must be correct and within a tolerance of 5%. Keep the test short, as it may stress the PSU.
For the first live test, I removed the CPU module, the SIMMs, and all Zorro boards. The Amiga won't boot like that, of course. But if something should go horribly wrong, the damage would be limited to the mainboard only (which is still bad enough).
Then I turned on the power, for the first time in maybe 20 years. The power LED lighted up. There was no smoke, no smell of burnt electronics, all the chips stayed cool. I checked the power lines, and all voltages were within the expected range. This was looking really good! I turned the power off again.
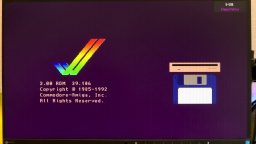
Now I was confident enough to remount the CPU module and the SIMMs. I also inserted a scandoubler, and connected a monitor to it. Then I turned the system on again. And a few seconds later, I got a picture.
I was probably never that happy to see the Amiga boot screen! 🥲
I had invested some money and many weekends into the refurbishment project, with unknown outcome. All the patience finally paid off.
Reassembly
The old mechanical hard disks were loud, slow, and produced a lot of heat. Since I want my Amiga to be as silent (and modern) as possible, I decided to use a SCSI2SD hard drive emulator instead. Alternatively, an IDE to Compact Flash adapter can be connected to the internal IDE header.
Besides that, I only left a floppy disk drive in the drive cage, but maybe I'm going to replace it with a Gotek floppy drive emulator later. The minimalistic equipment and the modular design of the PSU gives a clean and tidy look on this side of the case. It is also good for the ventilation.
On the other side, the freshly recapped MaestroPro and Toccata sound boards have already moved back to their Zorro slots.
Let's have a look at the outerior. The CBM Museum Wuppertal did an excellent whitening job again. The keyboard looks as good as new, and the outline of the old sticker on the front is almost invisible now. The paint shop did a good work as well, the cover now looks almost brand new.
I've tried to use my original Workbench installation from the 1990s, which I kept on using in an UAE emulator after that, but it was too messed up and crashed the real Amiga while booting. Finally I gave up and installed a fresh Workbench 3.2 from scratch.
What is still missing is a ZZ9000. It will serve mainly as a HDMI graphics card and Ethernet card. After that, my good old Amiga 4000 is ready for some serious Amiga programming again. 😉
Kudos
A refurbishment project like this is not possible without the help of a number of people. First of all, I want to thank the members of the A1K.org Amiga Board, especially halbvier for organizing the rare parts that I needed for the RTC repair. I want to thank the people of the CBM Museum Wuppertal for carefully whitening the plastic parts, and for the nice talk we had. I also want to thank Jan Beta because his YouTube channel inspired me to refurbish my two Amigas.
This project is dedicated to my brother Robert, who had taught me how to solder and how to repair old hardware. I miss you.
More like that?
Read about LinuxJedi's double A4000 restoration.


