In the first part, I dusted off and checked my old Amiga 500. I've also ordered all parts for the project, and they have been delivered by now. Let's start with the restauration!
Recapping
All home computers of the 1980s and 1990s have been designed for common households, and thus had to be cheap. Commodore did not expect that the Amiga would become an "old dame" some day, so they used standard components. A common problem is that electrolyic capacitors dry out over the years, losing their capacity. Some may even leak and, in worst case, damage the board. So the first restauration step is always to replace all electrolytic capacitors, even if they should still look fine.
As I don't want to repeat that process in a decade or so, I ordered premium capacitors with an expected lifetime of 10,000 h, which is probably tenfold of the standard caps' lifetime. At the bottom of this article, I have listed all the caps on my Amiga 500 Rev 6A board.
On the first sight, all capacitors seemed to be fine. Still, after removing one of them, I found traces of dried electrolyte on the board and at the bottom of the component. It really shows that a superficial inspection can be deceiving.
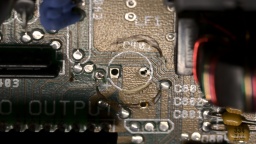
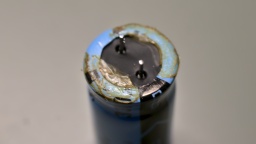
I also removed the wires of my self-made NMI button, and looked for cold solder joints and other potential problems. As final step, I carefully washed the mainboard with IPA.
HDMI Output
Let's start with the next construction site. As it gets more and more difficult to find TVs with a SCART connector (and I never liked them anyway), I want to connect my Amiga 500 via HDMI. Luckily there is a project by c0pperdragon that adds a pixel-perfect HDMI output to the Denise chip. The converter cannot be bought at shops, but you need to assemble it yourself. It consists of a few standard components that can be bought at good electronic shops, while the board can be ordered at PCB manufacturers. The assembly requires some fine-pitch SMD soldering though. If you don't feel comfortable with that, you maybe find a private seller for a readily assembled board.
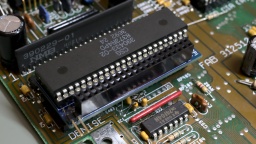
To install the adapter, the Denise chip is removed from its socket first. Then the adapter is placed into the socket, and Denise into the adapter. A button can be connected for changing the configuration and taking screenshots, but that is not really required for operation.
The RGBtoHDMI firmware needs to be extracted to a FAT formatted MicroSD card. Make sure to use release 20210322_f771e51 or later. Earlier releases will not work, but only show four colored rectangles.
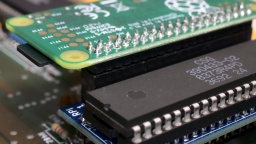
Finally the Raspberry Pi Zero is plugged into the socket. Be very careful here! The pin header will also fit if not aligned properly, and may then damage your Raspberry or (even worse!) your Amiga.
New Power Supply
In the first part I found some liquid at the bottom of the power supply's PCB. I suspected it was capacitor liquid, but my contact at the CBM Museum Wuppertal explained me that it was just a lot of flux. Still, the old power supply would need a technical overhaul, which I can only recommend to people who know exactly what they are doing.
WARNING: Switched power supplies may still contain high voltages hours after they have been disconnected from mains. I strongly advise against attempting repairs yourself. If you decide to keep your old PSU, please ask a trained technician to restore it for you!
As I am not "trained personnel" myself, I decided against restoring the original PSU, but for replacing it by a Mean Well RT-65B. It has sufficient power, and also fits nicely into the original Amiga PSU case.
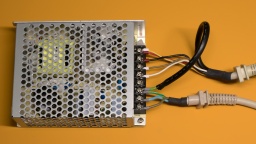
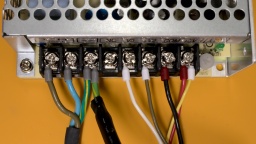
Before I removed the wires from the old PSU, I took notes on what color is connected to what voltage. Then I removed the wires, put crimp shoes on the wire endings, and connected them to the corresponding output of the new PSU.
My original PSU had a separate SEN wire. It is connected to +5V at the power plug, and is used so the old PSU could compensate wire losses and provide exactly 5V there. The replacement PSU does not provide a sense connector, so I just connected the SEN wire to the +5V line to increase the total cross-section and reduce losses, but it can also just be left open.
The "shield" wire must be connected to earth.
ATTENTION: There were different variants of Amiga 500 power supplies on the market. Your number of wires, and the wire color code, may be different. Do not just rely on my photos!
This is how it looked like after the wiring:
Do not connect your PSU to mains yet! First switch your multimeter to continuity test mode, and test if your earthing is connected to the PSU case, and to the shield and the shield pin of the Amiga power plug. After that, test if the power lines are properly connected. Now you can power up your PSU, and use your multimeter to check the voltages at the Amiga power plug.
ATTENTION: Please be very careful when you test the PSU outside the case. Make sure you cannot accidentally touch the live terminals. Also do not open the shielding of the PSU.
Test Run
After I made sure all voltages are correct, it was finally time for a first test run.
As I don't have many disks any more, I had ordered a GOEX drive as a replacement for the original floppy drive. It emulates a disk drive, but uses ADF files from a SD card. It even emulates the mechanical noises of the head stepper motor, which actually sounds much better than expected. I connected it to the floppy header of the mainboard, and used a cardboard box to make sure it won't cause short circuits.
Then I checked everything again. Is the mainboard okay? Is the HDMI converter properly connected? Is the GOEX drive connected? Is the Raspberry properly seated and the MicroSD inserted? Is nothing there that might cause a short circuit? Is the PSU protected against accidental touching the live terminators?
And then, after almost 30 years, it was finally time to wake up my Amiga 500 again.
I first booted an Amiga Test Kit disk and checked the RAM and the CIAs. After that, I ran some demos. The picture quality of the HDMI converter is stunning!
Meanwhile I also got the case and keyboard back from the whitening service. I cannot wait to put it all back together, and enjoy my shiny new Amiga 500.
Capacitor List
The caps list of my Amiga 500 Rev 6A, and the replacement parts I used:
| Qty | Type | Reference | Manufacturer Number |
|---|---|---|---|
| 2 | 3300µF 10V | C401 C402 | Panasonic EEU-FR1A332 |
| 1 | 470µF 16V | C307 | Panasonic EEU-EB1E471 |
| 6 | 100µF 16V | C811 - C816 | Panasonic EEU-FR1E101B |
| 2 | 47µF 16V | C821 C822 | Panasonic EEU-FR1H470B |
| 4 | 22µF 35V | C303 C304 C324 C334 | Panasonic EEU-FR1H220 |
| 2 | 10µF 35V | C306 C712 | Panasonic EEU-FR1H100B |
Notes:
- All capacitors are radial and have a lead spacing of 5mm.
- C401, C402: Height should be 24mm or less to fit under the shielding.
- C324, C334: Bipolar caps may enhance audio quality. I haven't tested that though.
- You can use any fitting capacitors with the same capacity and the same (or higher) voltage.
- Temperature rating should be 85°C or, even better, 105°C.

