 A good way to relieve the strain from your eyes while working on a PC, is to illuminate the wall behind your monitor. Jason Fitzpatrick wrote an interesting article about what bias lighting is and why you should be using it.
Many light sources can be used as bias lighting. I have used an old bedside lamp for a while. But what about something more stylish? What about a LED strip on an aluminum profile?
In this project, I am going to make a Wall Bias Lighting myself, and write a controller software for it. The source code will be released on my GitHub profile eventually, so you will be able to customize it.
Proof of Concept
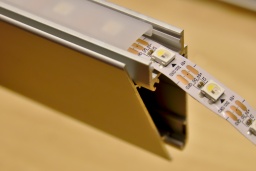
To make it a true premium lighting, I use a LED strip that consists of SK6812 RGBW LEDs. It can produce colors, but it also has separate white LEDs for a clean neutral white. Even better: Each LED can be addressed and the color changed individually. It would be possible to illuminate the wall behind the monitor in a bright white, while the visible parts of the strip are in a soft blue that won't dazzle the eyes.
AdaFruit sells these LED strips under their brand name NeoPixel, but there are also no-name strips on the market that are fully compatible and considerably cheaper. The strips are usually sold on reels of up to 5 meters length. They can be shortened to the desired size with scissors, and have an adhesive tape on the back so they can be glued to aluminum profiles.
This is the bill of material for the first proof-of-concept phase of the project:
- An SK6812 RGBW LED strip with 60 LEDs per meter
- An aluminum wall profile for LED strips
- 1x AdaFruit Feather M0 Express
- 1x Level converter (read below)
- 1x 1000 µF/16 V capacitor, 1x 500 Ω resistor (read here why they are needed)
- 1x 5 V power brick. Each LED is said to consume up to 60 mA (I couldn't find concrete figures), so you will need 18 W per strip meter if you want to set all four colors of all LEDs to maximum brightness.
The assembly was rather simple. First I cut the profile and the strip to the desired length and glued them together. Then I connected the strip to the power supply, and the strip's data line to the Feather via the level converter.
The next thing on the to-do list was a quick test drive, to check if some of the LEDs are defective. So I installed CircuitPython on the Feather, and wrote a tiny test program that just cycles through the colors red, green, blue, and white. With this pattern, even a single defective LED would immediately catch one's eye.
I turned on the power supply, aaaand... Nothing! 😲 All the LEDs stayed black.
I checked and double checked the wiring, but everything seemed to be correct. I tested my test program on the single NeoPixel that is mounted on the Feather, and it worked there.
Puzzled, I connected my scope to the data line of the LED strip. It immediately revealed the culprit.
The Feather runs on 3.3 V, and so the signal on the data line has an amplitude of 3.3 V.
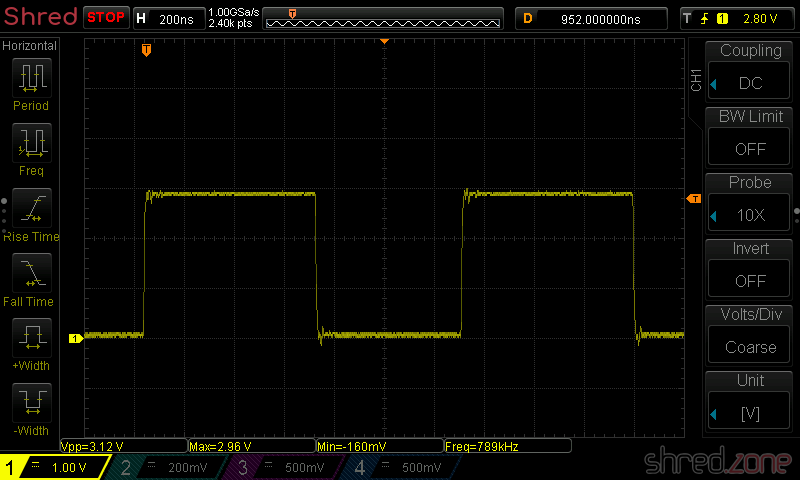
The LED strip runs on 5 V though, and also expects a signal amplitude of 5 V. The logic converter between the Feather and the strip is supposed to convert the 3.3 V signal to 5 V. However, the BSS138 based bi-directional logic level converter from my spare part box turned out to be too slow for this purpose. The output level starts at 3 V and then ramps up to 4 V.
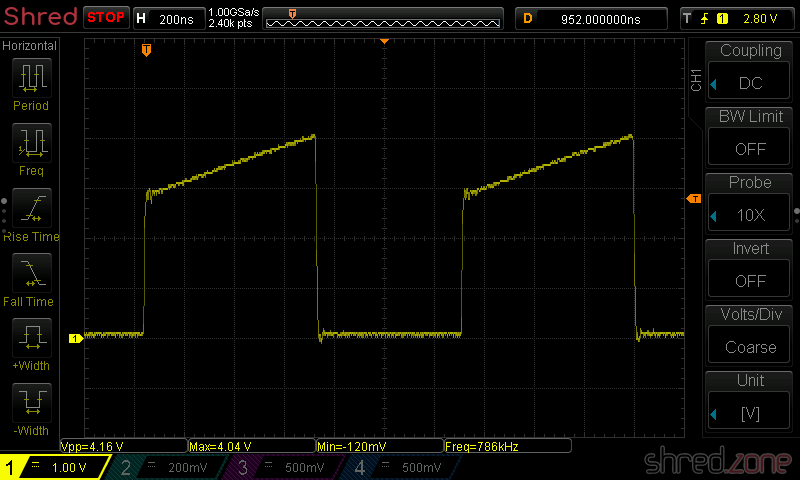
This is not sufficient for the SK6812, which needs a 5 V signal and a very precise timing with clean signal edges. Both was not given, so the LEDs stayed black.
I replaced the logic level converter by a standard 74HCT125 buffer IC, and tried again. The LED strip immediately came to life and cycled through the colors. The scope now shows a clean (well, more or less clean) 5 V signal.
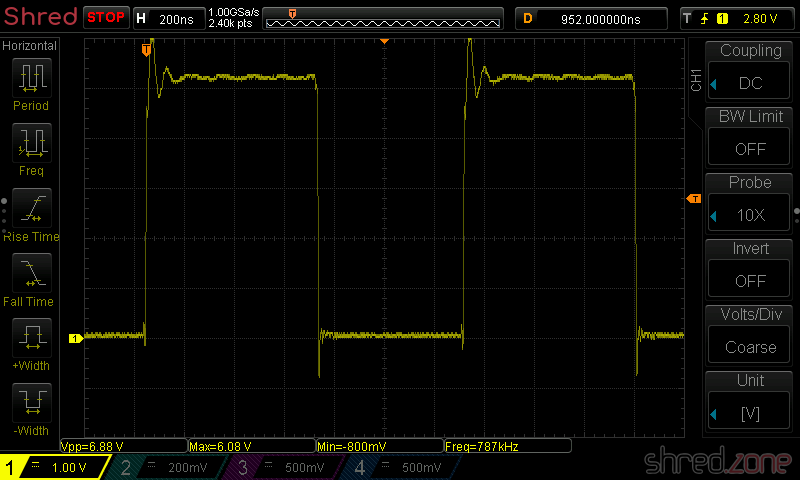
My proof-of-concept is working. 🎉 This is what the circuit looks like:
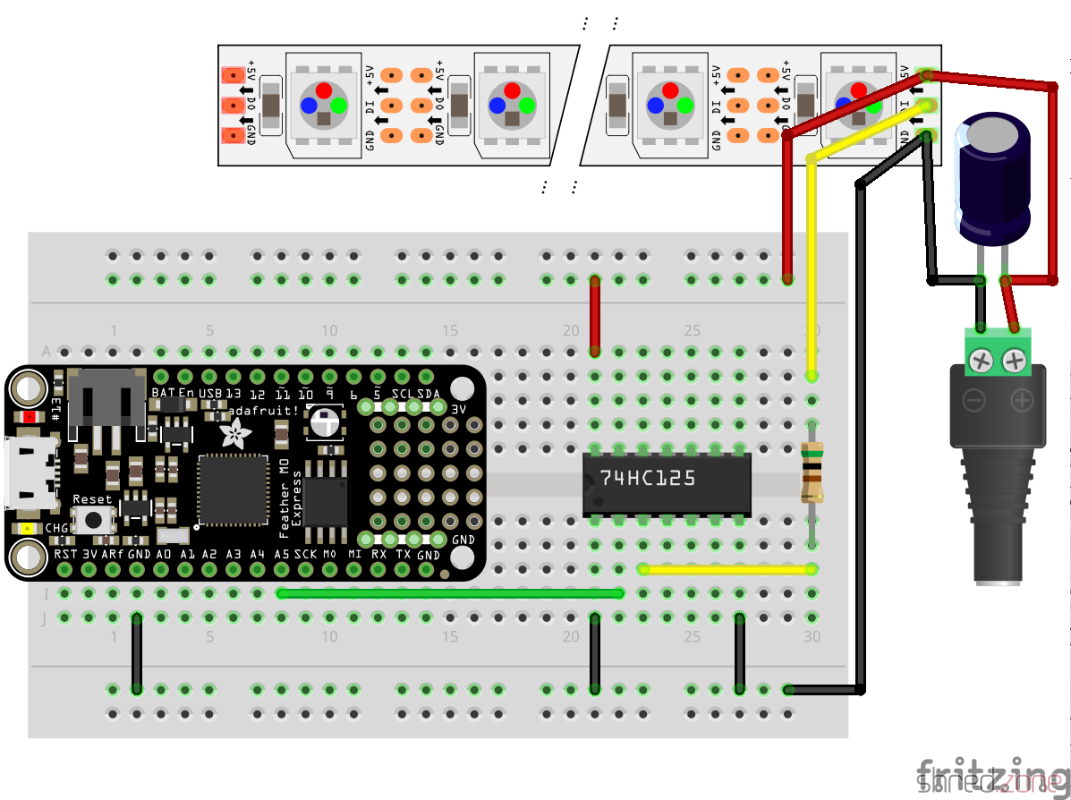
While the LED strip is powered by the power brick, the Feather is going to be powered by USB as long as I am developing the software. Later I will also supply the Feather with LED power, so it runs stand-alone.
Never connect the Feather to an USB port while it is supplied by an external power source. It could damage your computer.
What next? I'm going to add a power button, so I can turn the light on and off. For controlling the brightness and light effects, I am also going to add a display, a rotary switch, and another button. Stay tuned…