C64 is ready

#CDP-991

Reviving a Sony CDP-991, Part 5

The player is playing again. Time for some final cleanings.

Fifth Problem: Crackling Volume Pot

The volume assembly with the pots on the left. Just spray into the hole. After the calibration part, this is going to be a walk in the park. Or so I thought.

On the CDP-991, the playback volume can be changed via remote control. There's a motor that actually drives the volume knob and the potentiometers. The custom file feature allows to store individual volume settings for different CDs.

Due to the construction with the pots and the motor, the volume control assembly is rather big and is mounted to the front panel with screws. I removed the screws and the volume knob, but still could not remove the assembly for cleaning. It was still fixed somewhere else. The service manual gave no hint about how to remove it.

So I just tried my luck and sprayed some contact cleaner into the holes of the three pots close to the front. It worked, and saved me from finding a way to remove the assembly.

And that's it... I closed the case and polished it with a microfiber cloth and a soft cleaner. Then I put batteries into the remote control.

Welcome back to the living room, my good old CD player! πŸ˜€

Retrospective

Looking back, I am surprised how much is still working and in a good shape after 27 years. I am also surprised that I could still get a good service manual, and all the necessary replacement parts.

For most parts of the restauration, I just needed a screwdriver, cotton buds, isopropanol, and grease. So basically it can be done by anyone who isn't all thumbs. Just the pickup replacement and the calibration needs more elaborate equipment.

Reviving a Sony CDP-991, Part 4

The CD player finally plays music again, but still has trouble with the higher tracks.

Fourth Problem: Worn out Laser

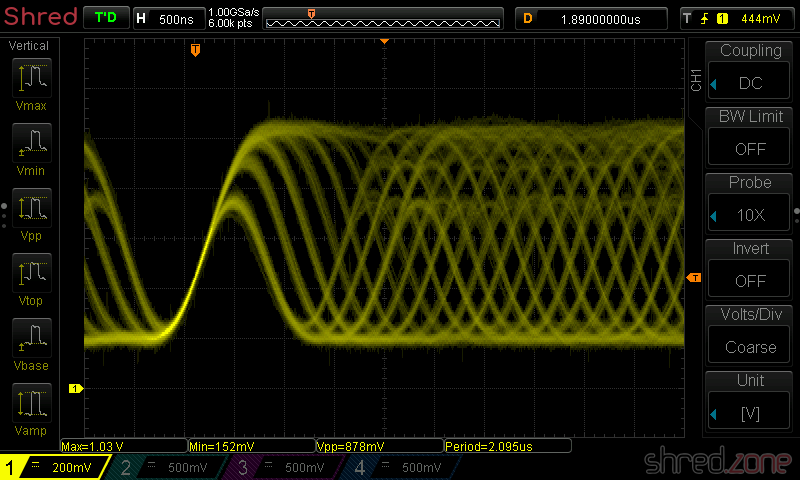
Let's find out how worn out the laser actually is. I soldered a wire to the RF test point and connected it to a scope.

The service manual recommends to use a special test CD, but you can use any CD for the RF test. I found out that older CDs gave better results, probably because modern production methods are cheaper and less reflective. Do not use CD-R, as these discs use a dye and are not as reflective as standard CDs.

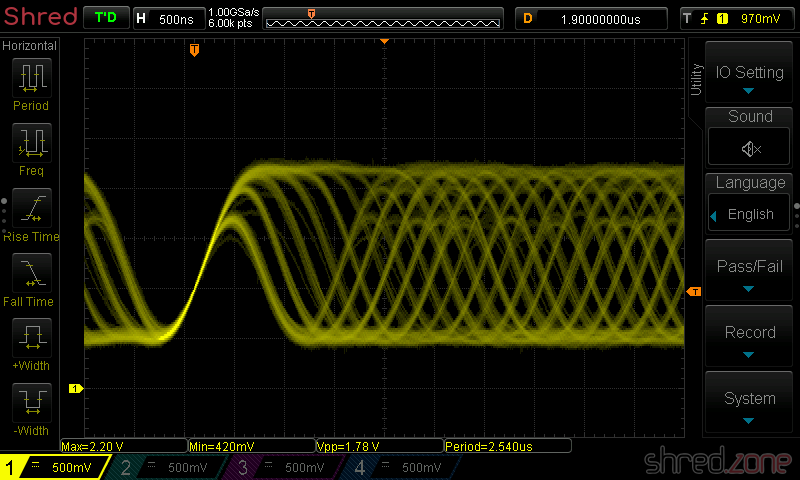
According to the service manual, the signal should have an amplitude of about 1.2Vpp (+0.2V, -0.4V).

The actual amplitude is just above 600mVpp, far below the required minimum of 800mVpp.

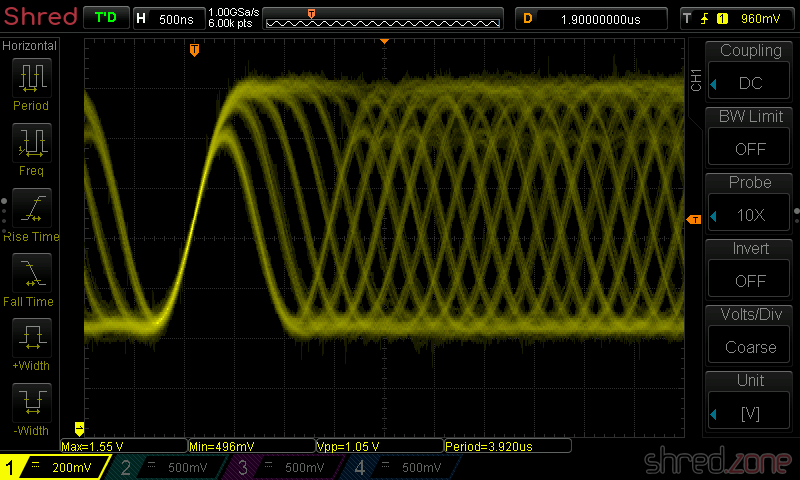
The first thing one should try now is to clean the lens. I used a cotton bud and 100% isopropanol for that. After that, the amplitude was a little better with about 880mVpp, but still at the minimum.

I could now recalibrate the player and try to get the best out of it.

But honestly, a new optical pickup module for this player can be ordered at the Bay for less than €20. It's not genuine, since Sony is not producing the KSS-240A any more. But I am curious how good that remake actually is. If it should be worse, I could still continue to use the original one.

The optical pickup is very sensitive to static discharge. If you try the replacement at home, use an antistatic wrist strap and other ESD protective measures while handling it!

The replacement of the pickup was much easier than expected. Only a plastic clip is holding the metal shaft of the sled in place, so it could easily be pulled out. After that, I could remove the old pickup.

And while I was at it, I thoroughly cleaned the shaft and the plastic parts from the old grease again, and reapplied a bit of fresh silicone grease. I also applied a little bit of grease to the gears that are moving the sled.

Then I inserted the new pickup and fixed it with the shaft. The first test with the new pickup brought good news, and bad news. The good news is that the replica pickup is working, and the RF amplitude is even above the 1.4Vpp upper limit now.

The bad news is that the drive was making a loud and awful whistling noise now. So I recalibrated the player as described in this restauration project of a similar player.

The calibration was successful. The whistling noise is gone (except on track changes), and the player plays all the tracks again. I am sure an experienced technician can calibrate it a lot better, but I'm happy with the result.

And thanks to my proper cleaning, the sled noises are also much better. By all means good enough considering the age of the player.

I'm almost done! There's just a tiny problem left: The crackling volume pot.

Reviving a Sony CDP-991, Part 3

In the last part, I made the tray operational. It's a precondition for this part: Inserting a CD.

Third Problem: Stuck Sled

In the opened tray, I put a random CD from my shelf. Then I pressed the close button. The tray closed, and a few seconds later, the player showed the number of tracks and total playback time. Yaaay! πŸŽ‰ The optical pickup seems to be working.

Daringly I pressed the play button, the disc started spinning, and then...

Nothing. No playback. Just silence.

I also noticed that the characteristical noise of the moving sled was missing when I changed through the tracks.

My first thought was that the laser was worn out after all. But then, on the other hand, the pickup would not have been able to read the CD's table of contents. It rather seems that the sled was stuck.

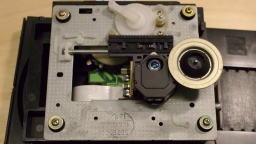
The optical deck with the pickup on the sled I disassembled the drive again. The pickup moves on a metal shaft and a plastic strip. Both were greased. I carefully removed the old lubrication with cotton buds and isopropanol, then applied a tiny bit of fresh silicone grease.

Next attempt... And this time, it was successful! After about 15 years, I heard music from my good old CD player again!

But I'm not done yet, as I already spotted some more problems. The player refuses to play higher track numbers, and the sled is still making strange noises on a track change. Also, the volume potentiometer crackles awfully and needs some cleaning. More of that in the next parts.

Reviving a Sony CDP-991, Part 2

In the first part, I powered up my CDP-991 again after 15 years. Next step: Open the tray.

Second Problem: Weak Tray Belt

The replaced tray belt I pressed the "open/close" button, and the tray opened. I pressed the button again, and the tray closed. Almost. After a few seconds it opened again. Obviously, the mechanism got too weak to completely close the tray.

The exploded view in the service manual revealed that the tray is moved by three gears and a belt. I removed the drive and then the tray, to expose the tray belt. Indeed, it got flabby over the years.

Warning: There are live parts inside the case. Before opening it, always unplug the power. If you are going to plug in the power while the case is open, always take appropriate measures to protect yourself from accidentally touching live parts. If in doubt, better ask a trained person for help.

It was easy to find a new tray belt on the Bay for just a few euros. I ordered one, and it was already delivered the next day.

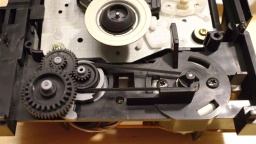
After replacing the belt and assembling the drive, the tray finally opens and closes now. It is a clever construction. The top gear moves the tray. When it is almost closed, the gears are pushed sideways and turn the cam below (the silver part in the photo). The cam pushes up the optical deck and clamps the CD to the spindle. This part of the movement takes quite a lot of force. Too much for the old and worn-out belt.

It is a good idea to replace the belt on spec, after all those years. If the tray still won't close, the culprit might be the switches on the tray motor assembly. On the photo, you can see their "tongues" to the left and right of the motor. These switches detect when the tray is fully opened or closed. The contacts may have become dirty over the years, and just need some cleaning. Since my player's tray is operating normally now, I postponed this "fun" to a long and boring winter's day. πŸ˜‰

The next step is critical. Is the laser pick-up still operational after all those years? Let's find out! I'm going to insert a CD.

Reviving a Sony CDP-991

Let's do a hardware related project for a change. A few days ago, I found my good old CD player from the time when I was in my early twenties. It's a CDP-991. Sony has produced them around 1991.

I still remember when I was in a HiFi store and gave the CDP-991 a try. I brought my "horror CD" with me. It had a few deep scratches from a careless handling of mine. My old CD player at home could play track 1 with a lot of skipping, and capitulated on the next tracks. I wondered how the CDP-991 would play it. Maybe it would play track 1 with almost no skips, and even a bit of the next tracks? I was flabbergasted when the player was totally unimpressed of the scratches, and just flawlessly played all the tracks. I bought the CDP-991 on the spot. 😁

It was the component of my HiFi equipment that I was most proud of. And even many years later - in the times of mp3 players, smartphones, and streaming - I never had the guts to throw it away. It sat in a cardboard box, buried in a storage room, patiently waiting for me to rediscover it. Now is the time...

Today I have turned on my good old CD player for the first time after maybe 15 years, and it just started up. I was happy to see the display light up again.

However, 27 years surely left its marks on the device. Let's find out how bad the damage is.

First Problem: Amnesia

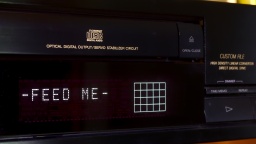
Feed me! The CDP-991 is equipped with a feature Sony calls "custom file". The player is able to recognize up to 185 discs. One could set the CD title, delete boring tracks, and store individual index marks. One could even customize the "NO DISC" text. I have changed it to "-FEED ME-" back in the old days, as a reference to Audrey II from the musical Little Shop of Horrors.

This custom text was gone now, and the player greeted me with the standard "NO DISC" again.

I wasn't too much surprised of that. Today we are used to store large amounts of data on SD cards, which retain them for tens of years without power. At the time the player was built, EEPROMs were the only non-volatile memories on the market. They could barely store a few bytes, far from 185 disc titles. For those amounts of data, it was more common to use static RAM and a backup battery.

I expected that the battery was empty and due for a replacement. Even worse, leaking battery acid could have damaged the PCB. I opened the case and looked for a backup battery, but found none. So I hoped to obtain a circuit diagram and find out more about how the player stores its data. After just a few minutes, I found the official service manual as downloadable PDF in an excellent quality. The internet is awesome!

The manual had good news for me. Instead of a battery, Sony has used a 0.1F capacitor, which is able to retain data in the static RAM for about a month without AC power. It ran out of energy long ago, but all I had to do was to reconnect the player to the mains to charge it again.

Of course, the first thing I did was changing the "NO DISC" text back to "-FEED ME-".

The first problem is fixed. Next step: Open the tray.