If you own a Synology NAS, you probably know the trouble that it frequently wakes up from hibernation without any obvious reason. Synology has added a more or less undocumented debugger for that issue. If enabled, it will log the reason for waking up from its beauty sleep, so one can take measures against it.
WARNING: This article is targeted at experienced Linux users. Even if you manage to enable the debug mode, you still have to analyze the log files, find a solution to your individual problem, and assess if it is safe to apply. If you make a mistake, you can cause a lot of damage to your system and your data. Please take this advice seriously.
In any case, make sure your data is properly backed-up. Remember that a RAID is not a backup!
Also note that the debug mechanism has changed from time to time, so it may be completely different on your NAS depending on the DSM version that is used.
 You need to log into your NAS via ssh, and become root. (If you struggle at that, better stop here for your own good.)
Open the /etc/synoinfo.conf file, and locate these lines:
enable_hibernation_debug="no"
hibernation_debug_level="1"
To enable the debugger, change enable_hibernation_debug to yes.
The hibernation_debug_level line changes the debug level. The default 1 only logs the reason for your NAS to wake up, which should be sufficient. Level 2 also logs the interrupts that caused the wake-up.
After changing the configuration, invoke this command:
syno_hibernation_debug
The command itself gives no visual feedback, and also does not provide any kind of help or options. However, you can check the /tmp/hibernation.debug file. If the file is present, the debugger was successfully started, and the file contains the PID of the debugger process. If you would run that command again, it would start another debugger instance. It would interfere with hibernation and would also need to be killed manually later, so make sure there is only one debugger running.
All you need to do now is log out and wait for the NAS to wake up by itself. Then log in again, and check the log files /var/log/hibernation.log and /var/log/hibernationFull.log. They contain a hint to the reason of the insomnia.
As there are a lot of possible reasons, fixing the problem is out of scope of this article. There may even be no viable solution.
To turn off the debugger, just change /etc/synoinfo.conf back and invoke syno_hibernation_debug again.
 A minor downside of the Raspberry Pi is that it is not equipped with a battery backed-up real-time clock. After every reboot, the system time is messed up and needs to be corrected by NTP, which in turn requires a network connection.
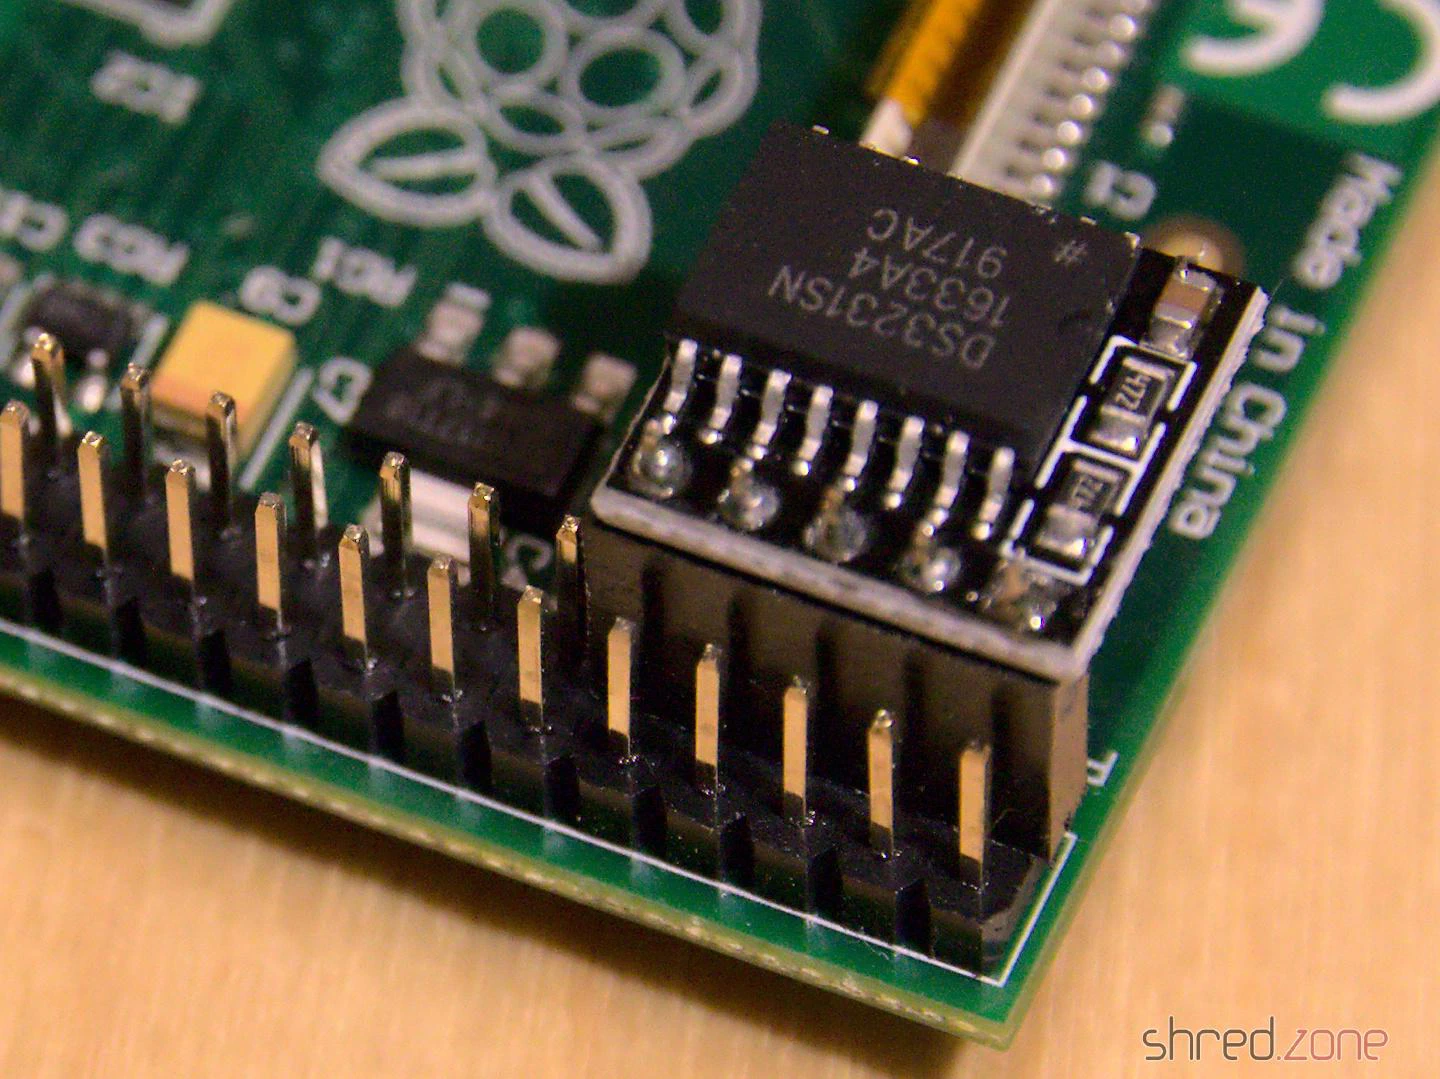
Luckily, there are readily assembled RTC modules available. They base on the DS3231 real time clock chip. A tiny battery is keeping the time when the Raspberry is disconnected from power. You can find those modules for less than two Euros a piece at marketplaces like Amazon, eBay, or Alibaba. The module is just plugged onto the pin header of the RasPi.
It is quite easy to use the RTC on Raspbian. On Fedora for Raspberry Pi, the installation was a little more tricky though.
In a first step, the RTC must be added as a new I²C device:
/usr/bin/echo ds3231 0x68 > /sys/class/i2c-adapter/i2c-1/new_device
(If you have a Raspberry Rev 1, you’d use /sys/class/i2c-adapter/i2c-0/new_device instead.)
The RTC does not store the time zone, so we need to tell the system that we’d like to use the system’s time zone:
timedatectl set-local-rtc 0
And finally we copy the current system’s time to the RTC chip:
hwclock -w
The RTC is now set up and ready for operation. But we’re not done yet. When the system boots up, the DS3231 is unknown to the system again. We have to add a systemd service for adding it and reading the time, by creating a file called /etc/systemd/system/my-rtc.service with the following content:
[Unit]
Description=Enable battery backed-up RTC
Before=basic.target
After=sysinit.target
DefaultDependencies=no

[Service]
Type=oneshot
RemainAfterExit=yes
ExecStartPre=-/usr/bin/bash -c '/usr/bin/echo ds3231 0x68 > /sys/class/i2c-adapter/i2c-1/new_device'
ExecStartPre=-/usr/bin/sleep 0.2
ExecStart=/usr/sbin/hwclock -s

[Install]
WantedBy=basic.target
The service is enabled via:
systemctl enable my-rtc
And now every time the system boots up, the DS3231 is added as I²C device and the system clock is set to the time found in the RTC. If a network is available, NTP will later take over and set the network time.
It’s not the most elegant solution, I guess. I had to add a sleep command because it turned out that the hardware is not immediately available after adding the device. I’d like to hear from you if you found a better way.
Remember to manually use hwclock -w from time to time, to reset the RTC to the correct time. If you shut down your RasPi frequently, you could add another systemd service that automatically writes the current time on system shutdown.
 The season of long winter nights is coming, so I got myself an AdaFruit Circuit Playground Express for some home decoration.
My plan is to program it using CircuitPython, a MicroPython derivate that is adapted to the AdaFruit hardware.
CircuitPython must be installed to the Circuit Playground first, which turned out to be difficult with Fedora Linux in a first attempt. The troublemaker was the ModemManager, which is still installed by default. It detects the serial port of the AdaFruit device, and then hogs this resource because, well, it might be a modem. 🙄
My older readers certainly still remember what a modem is. 😉 But to make a long story short, almost no one is using a serial modem nowadays, so the ModemManager does not serve any useful purpose. However, it cannot be removed, because other important packages still depend on it. The only way is to stop it permanently:
sudo systemctl stop ModemManager
sudo systemctl disable ModemManager
After that, I could finally install CircuitPython to the Circuit Playground. First I downloaded the matching uf2 file. After that, I connected the Playground via USB, and changed to the bootloader mode by pressing its reset button twice (like a double-click).
The Circuit Playground is now mounted as an USB drive called CPLAYBOOT. All there is to do now is to copy the uf2 file to this drive. The Playground automatically reboots after that. If everything went fine, it will come back as an USB drive called CIRCUITPY.
The next step is to install the AdaFruit libraries to that drive. I downloaded the latest library bundle that matched my CircuitPython version, and just unpacked it to the CIRCUITPY drive.
That’s it… All there is to do now, is to open the code.py file in an editor and change the code. It is immediately executed when it is saved.
For a start, there are a lot of code examples for the Circuit Playground Express on the AdaFruit web site.
UPDATE: It seems that starting with hardware version 2, these switches have an actual web interface. Too sad my ones are version 1. 😢
 Frankly, I didn’t expect it and I was somewhat disappointed when I found out that the TP-Link TL-SG108E Easy Smart Switch (and its little brother TL-SG105E) cannot be configured via web browser. And I was even more disappointed when I found out that, even though Linux and MacOS were listed on the retail box, the configuration tool Easy Smart Configuration Utility runs on Windows only. And they mean it! When started in a Windows VM, the utility does not see any switches.
So the devices are rather cheap for a smart switch, but they still come with a price: no web interface.
However, thanks to some help in the interwebs, I was finally able to run the Configuration Utility on Fedora Linux. It’s not that easy, though.
Before we start, please be aware that this is a hack! I don’t know if running the Configuration Utility on Linux comes with side effects to the switch configuration and security. Maybe the switch can even suffer permanent damage that way. So use it at your own risk!
Running the Configuration Utility on Linux
The good news is: The Easy Smart Configuration Utility is written in JavaFX, so it runs on Linux even without Wine! First you need to download the utility from the TP-Link home page. It is a zip file containing an exe file. Unfortunately you have to run the exe file on a Windows machine to unpack it. I promise this is the only time you will actually need Windows. After that, you will find a file called Easy Smart Configuration Utility.exe in the installation directory. This is the only file we will need. Copy it to your Linux machine, and while you’re at it, also rename it from .exe to .jar. Yes, it’s just a Java archive file!
In a next step, you need to download and install the official Oracle Java on your Linux machine. OpenJDK will not be sufficient, as it does not contain JavaFX (yet).
When you are done, you should be able to start the Easy Smart Configuration Utility with this command:
java -jar "Easy Smart Configuration Utility.jar"
However, it does not find any switches. This is because the software discovers the switches via UDP broadcast, but unfortunately the interface is bound to the local IP address instead of any address, as it is required on Linux. We need to tweak the firewall…
If your system is running firewalld (e.g. on Fedora), execute these lines to add a firewall rule (and replace $your_ip with your local IP address):
firewall-cmd --add-port=29809/udp
firewall-cmd --zone=public --add-forward-port=port=29809:proto=udp:toaddr=$your_ip
If your system is running iptables, you need to execute these lines:
echo 1 > /proc/sys/net/ipv4/ip_forward
iptables -t nat -A PREROUTING -p udp -d 255.255.255.255 --dport 29809 -j DNAT --to $your_ip:29809
Now hit the Refresh button on the Configuration Utility, and your switches should finally appear. The GUI is still a little ugly with the input elements being too tall, but that is rather a cosmetical issue.
Firmware Upgrades
Firmware updates still failed with a strange error, and the switch needing to be powered off and on again. To successfully perform a firmware upgrade, I had to do these steps:
- Connect the switch directly to the computer, and disconnect everything else from the switch.
- Shut down NetworkManager (
systemctl stop NetworkManager). - Set up the ethernet interface manually (e.g.
ifconfig em0 192.168.0.2 up, it must be in the same subnet as your switch). - Invoke the iptables command from above again (use the IP address from the step above as
$your_ip).
After that, firmware updates finally succeeded, too.
Strange enough, the firmware image is transported to the switch via HTTP. It appears that there actually is a HTTP server running on the switch. An ASCII dump of the firmware file also reveals some HTML forms, so it seems like the switch is technically able to be configured via web frontend, but the feature has been disabled. Maybe it will be possible in a future firmware version, but I rather guess they found out that they ran out of memory when the switch was already on the production line. That would also explain the non-existing MacOS/Linux compatibility mentioned on the box.