I just had a stream of objects I wanted to sort and convert to a list. Optionally it should also be limited to a maximum number of entries. Piece of cake with Java 8:
Stream<T> stream = collection.stream().sorted(comparator);
if (max >= 0) {
  stream.limit(max);
}
List<T> result = stream.collect(Collectors.toList());
Or so I thought… The code above throws an IllegalStateException at runtime, stating that the “stream has already been operated upon or closed”.
The cause should be obvious. However it took me a while to find it, so I am posting it in case other people (possibly you when you came here via search engine) get stuck at the same place. Stream operations are very likely to return a different Stream object. The limit() method is such an example. In my code above, limit() operates on the stream and returns a limited stream. However I just throw away the returned stream and invoke collect() on the original stream, which was now already operated upon.
The solution is simple:
if (max >= 0) {
  stream = stream.limit(max);
}
 Sass is a kind of precompiler for CSS that offers additional features like nested styles, variables or includes. The syntax of scss files is similar to standard CSS, so it’s very easy to learn.
My goal is to:
- nicely integrate Sass into the Maven build process,
- use Jetty to see the web application with the compiled css files, and
- see changes to a Sass file live (without running Maven or restarting Jetty).
There is a sass-maven-plugin by the Apereo Foundation that already offers Maven integration and watching changes to sass files. However, I don’t fancy the default settings. The default location of sass files is the webapp directory, which means that the sass files are packed into the war file as well, exposing silent comments, variable names and maybe other things that are not meant to be published.
I prefer src/main/sass as source directory. As target, I choose a directory called generated-webapp, which is ought to contain all generated webapp stuff. In this directory, a css directory will contain the compiled css files. The sass-maven-plugin configuration now looks like this:
<plugin>
    <groupId>org.jasig.maven</groupId>
    <artifactId>sass-maven-plugin</artifactId>
    <version>1.1.1</version>
    <executions>
        <execution>
            <id>package</id>
            <phase>prepare-package</phase>
            <goals>
                <goal>update-stylesheets</goal>
            </goals>
        </execution>
    </executions>
    <configuration>
        <resources>
            <resource>
                <source>
                    <directory>${basedir}/src/main/sass/</directory>
                </source>
                <destination>${project.build.directory}/generated-webapp/css</destination>
            </resource>
        </resources>
    </configuration>
</plugin>
The reason for using generated-webapp instead of ${project.build.directory}/${project.build.finalName} is that Jetty only looks into src/main/webapp for static resources by default. However, if ${project.build.directory}/${project.build.finalName} was added, Jetty would also scan all compiled classes twice, which may result in errors (especially when Spring is involved). What needs to be done now is to add generated-webapp to the list of webapp resources:
<plugin>
    <groupId>org.eclipse.jetty</groupId>
    <artifactId>jetty-maven-plugin</artifactId>
    <version>9.2.2.v20140723</version>
    <configuration>
        <webApp>
            <resourceBases>
                <directory>${basedir}/src/main/webapp</directory>
                <directory>${project.build.directory}/generated-webapp</directory>
            </resourceBases>
        </webApp>
    </configuration>
</plugin>
After starting Jetty with mvn jetty:run, it nicely returns our css resources.
To make changes to Sass files immediately available, the Sass watcher is started in a second terminal with mvn sass:watch. Jetty will deliver all changes in src/main/sass now, without the need to restart.
A final problem to solve is that the generated-webapp target is not included in the war file by default. The maven-war-plugin needs to be configured properly:
<plugin>
    <groupId>org.apache.maven.plugins</groupId>
    <artifactId>maven-war-plugin</artifactId>
    <version>2.4</version>
    <configuration>
        <webResources>
            <resource>
                <directory>${project.build.directory}/generated-webapp</directory>
            </resource>
        </webResources>
    </configuration>
</plugin>
While upgrading my blog software Cilla to Java 8 and Hibernate 4, I found out that the old hibernate3-maven-plugin refused to create schema.sql files. Well, it wasn’t really surprising. The name of the plugin already implied that the plugin won’t play with the next major release of Hibernate.
I could not spot an official update of the plugin. Instead, I found Kai Moritz new Hibernate 4 maven plugin, which turned out to be very useful.
One key feature is to set up and initialize a local database for unit testing. I don’t need this feature for Cilla (yet 😉). All I need is a hbm2ddl style generation of a SQL schema file for setting up new instances of my blog software from scratch. It turned out that the plugin was easily configured that way, and so it got almost a drop-in replacement for the old plugin.
This is what the <plugins> section of the project’s pom file looks like:
<plugin>
    <groupId>de.juplo</groupId>
    <artifactId>hibernate4-maven-plugin</artifactId>
    <version>1.0.4</version>
    <executions>
        <execution>
            <goals>
                <goal>export</goal>
            </goals>
        </execution>
    </executions>
    <configuration>
        <hibernateDialect>org.hibernate.dialect.PostgreSQL82Dialect</hibernateDialect>
        <target>NONE</target>
        <type>CREATE</type>
    </configuration>
</plugin>
With the target set to NONE, the schema.sql file is quietly generated while building the project. If set to SCRIPT, a copy will be dumped to stdout.
A CREATE type only generates create statements of the database. The default is BOTH, which creates drop and create statements.
Since no actual database is created, there is no need to add user, password and url parameters.
A list of all configuration options can be found here. The plugin is available at Maven Central.
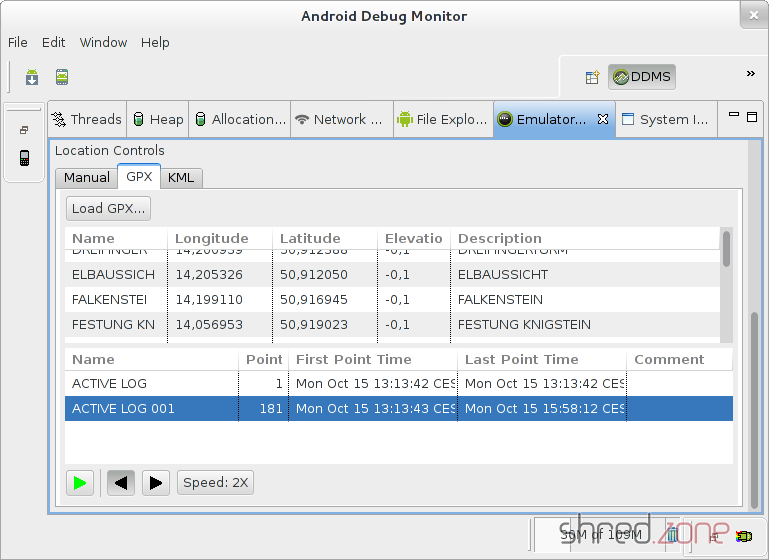 The Android Device Monitor is not just an aid for debugging applications, but also allows to simulate GPS positions, so you won’t need to actually run around in the countryside for testing your GPS app. But where to get test data from?
I have recorded some of my hiking trips with my Garmin GPS 60, and saved them in Garmin’s proprietary gdb file format. These files contain waypoints, routes and also recorded tracks.
The Swiss Army Knife for GPS files, gpsbabel, comes in handy for converting a gdb file into the GPX file format that can be read by DDMS. This is the line I used for conversion:
gpsbabel -i gdb -f hike-track.gdb -o gpx,gpxver=1.1 -F hike-track.gpx
Note the gpxver=1.1 option, as DDMS is unable to read GPX 1.0 files.
After converting and loading the GPX file into DDMS, I can now send single waypoints as GPS events to the emulated device. But beyond that, I can also play back a recorded track, and simulate that I carry around the emulated device on that track. This is very useful for testing GPS apps.
Android 4.2.2 comes with a new security feature. If you try to connect to your smartphone via adb and USB debugging, you will note that your device is marked as “offline”. Additionally, a dialog shows up on your device, presenting an RSA fingerprint of your computer and asking for confirmation to accept a connection.
The rationale is that if your device is lost or stolen, there is no way to read its content even if USB debugging was enabled.
Now, presenting an RSA fingerprint surely is a nice idea to avoid man-in-the-middle attacks. But how do you get that fingerprint in order to compare it with the one shown on the device? At first I thought there must be a command (or an adb option) that prints out the fingerprint, but I wasn’t able to locate one. After spending some time with my favourite search engine, I finally dug up a rather more than less complicated command line that prints out the footprint:
awk '{print $1}' < adbkey.pub | openssl base64 -A -d -a | openssl md5 -c | \
  awk '{print $2}' | tr '[:lower:]' '[:upper:]'
The command must be executed in the directory where adb stores the adb key, which usually is ~/.android (or /root/.android if adb runs as root).
If you are somewhat security paranoid, you surely wonder why, on the one hand, Google shows a footprint on the device, but on the other hand makes it difficult to find out if that footprint actually belongs to your computer.